 Tweet
Tweet
I hear there are a few OEM Grande's around with leaking airbags, so I thought I'd write this. Hope it goes smoothly for you!
Reason: Airbags were leaking often, dropping over night and could be heard hissing after some trips. Leak was seen with a soapy water spray coming from the bulge in the rubber near the base. This rubber was visibly cracked as well.

Parts:
-Special Service Tool = Caulking gun nozzle, slit along its length. (Worked beautifully and saves $30 from Toyota!)

-OEM Toyota grande airbags (RRP about $450 per rear corner).
If you want to lift or go for a thicker airbag, Airbagman looks good (See DIY Airbagman post by AMTS). I wanted to keep standard height for towing, and our oem airbags have lasted 10years. Not the most adventurous choice but a price comparative & simple install.
OEM airbags come with new internal o-rings/plates/retaining prongs inside the elbow connector. (Non-reusable part if your refitting the old airbag)
Tools:
Long screwdriver
Trolley jack
Wooden Blocks for extra lift
Second set of hands (thanks Philjay38)
Wire (on standby to hold spring clip while inserting or to help remove it)
Torch & small mirror to check alignment
Safety glasses (protect your your eyes from your dirty Prado)
Time: About 2hrs at a slow pace on a hot day.
Cut a slit along the length of your caulking gun nozzle, the length and thickness was fine with the one I used. Spread it open with a screwdriver to soften up the edges and widen for fitting.
I mostly followed the process as per repair manual, diagrams of the fittings were helpful.
Drivers side:
-Start with drivers side, easier access to learn the connectors.
-Turn off height control
-Jack chassis rail, take wheels off for easier working. I jacked and put stands under the chassis rail in front of the rear wheel, you could also jack under the rear diff. The diff should hang down while swapping the airbags to give you enough room fit them through. (You're very much under your 2T plus prado here, be careful! Chock the front wheels, etc)
-Remove Air line: Squeeze and slide back the plastic retaining cover. (You can see the air line connector from back under the passenger side wheel)
Press on the "SST nozzle" on to the hose. Push it into the airbag elbow fitting, you can feel it nudge open the retaining prongs.
Pull the airline gently, while the SST is inserted. It takes a little force for the bead on the air hose to slip out, the pressurised air will gush out. Keep the airline clean.

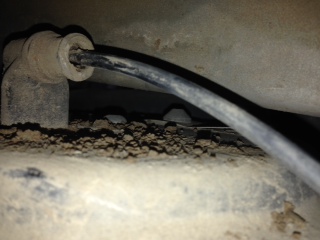

-Remove Spring clip: remove the spring clip, I pried it with a screwdriver from the wheel well side.
-Remove the airbag: it should easily compress and detach from the upper mount (the bottom of the airbag is not tethered but just sits into the lower mount)
...
Reason: Airbags were leaking often, dropping over night and could be heard hissing after some trips. Leak was seen with a soapy water spray coming from the bulge in the rubber near the base. This rubber was visibly cracked as well.
Parts:
-Special Service Tool = Caulking gun nozzle, slit along its length. (Worked beautifully and saves $30 from Toyota!)
-OEM Toyota grande airbags (RRP about $450 per rear corner).
If you want to lift or go for a thicker airbag, Airbagman looks good (See DIY Airbagman post by AMTS). I wanted to keep standard height for towing, and our oem airbags have lasted 10years. Not the most adventurous choice but a price comparative & simple install.
OEM airbags come with new internal o-rings/plates/retaining prongs inside the elbow connector. (Non-reusable part if your refitting the old airbag)
Tools:
Long screwdriver
Trolley jack
Wooden Blocks for extra lift
Second set of hands (thanks Philjay38)
Wire (on standby to hold spring clip while inserting or to help remove it)
Torch & small mirror to check alignment
Safety glasses (protect your your eyes from your dirty Prado)
Time: About 2hrs at a slow pace on a hot day.
Cut a slit along the length of your caulking gun nozzle, the length and thickness was fine with the one I used. Spread it open with a screwdriver to soften up the edges and widen for fitting.
I mostly followed the process as per repair manual, diagrams of the fittings were helpful.
Drivers side:
-Start with drivers side, easier access to learn the connectors.
-Turn off height control
-Jack chassis rail, take wheels off for easier working. I jacked and put stands under the chassis rail in front of the rear wheel, you could also jack under the rear diff. The diff should hang down while swapping the airbags to give you enough room fit them through. (You're very much under your 2T plus prado here, be careful! Chock the front wheels, etc)
-Remove Air line: Squeeze and slide back the plastic retaining cover. (You can see the air line connector from back under the passenger side wheel)
Press on the "SST nozzle" on to the hose. Push it into the airbag elbow fitting, you can feel it nudge open the retaining prongs.
Pull the airline gently, while the SST is inserted. It takes a little force for the bead on the air hose to slip out, the pressurised air will gush out. Keep the airline clean.
-Remove Spring clip: remove the spring clip, I pried it with a screwdriver from the wheel well side.
-Remove the airbag: it should easily compress and detach from the upper mount (the bottom of the airbag is not tethered but just sits into the lower mount)
...
Comment