Announcement

Collapse
No announcement yet.

D.I.Y Spotlight Install

Collapse
X
 
  • Filter
  • Time
  • Show
Clear All
new posts

  • D.I.Y Spotlight Install

    Oky doky, here we go, got down to business and installed the Lightforce 170's yesterday and here are some picks of the work myself and a HV sparky mate got up to amongst Macca's and Jacks and Dry hahaa.

    Ok, first to fit and drill the holes for the 170's @ a 10.2mm hole plus another hole just to the rear of this hole for the wires to pop into the bumper, pics for that later.

    Next was to find and cut into the Hi Beam Feed (red and white wire)

    The relay setup for spots and rear light just behind the main battery next to firewall for now

    The main lights wires, fed up behind battery, up and into the hole at top of radiator mount

    The firewall entry, in between the blue and green you can notice the heatshrink cables. Nice seal too.

    The dash mounted switches from Supercheap, with LED's, not too bright either, great look Green is for the spotlights and yellow for the rear worklight, but that wiring loom is curled into the foot cavity to the right for now until I have time to run the cable down to the rear, but the relay and switches are live.

    right amount of cable ready for joining to lights, after lunch of course haha oh and another jacks's

    Wires joined under bullbar, to save rubbing from bonnet

    Closer look, the top of the holes are filled with sikaflex to stop wire movement against bullbar, and all holes have been flapper wheel sanded to smooth off.

    Final check and we fired it up...... click......click...........no lights !! arhhhhhh :shock:
    How about a fuse chaps, what do ya reckon ! :roll:
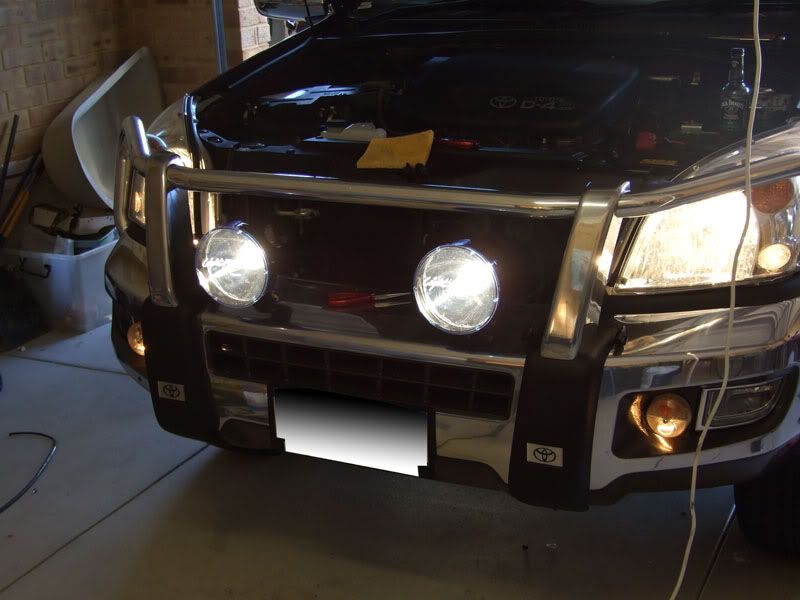
    Tadaaaa! we have light !
    [B]My 2007 D4D [COLOR=darkred]Flinders Red[/COLOR] Buildup[/B] - [URL="http://www.pradopoint.com/showthread.php?13590-Golly-s-Flinders-Red-D4D-GXL"] HERE[/URL] :cool:
    [B][COLOR=navy]K[COLOR=red]D[/COLOR][/COLOR][COLOR=darkorange]L[/COLOR] Designs[/B] (Designer for the 2009 GTG Banner) - [URL="http://kdldesigns.net/index.php/banners"] HERE[/URL] ;)
    ,

  • #2
    Re: D.I.Y Spotlight Install

    You fuelled up on a little Macca's there I see Golly. Very brave of you. After reading that "Fast Food Nation" book I just can't bring myself to touch the stuff.

    Good job though! The switch that I had installed with my Lightforces is wimpy to say the least. Added to that it is not lit so I'm always fumbling about for it in the dark. I've got another switch to put in there but just haven't got off my lazy butt cheeks to install it. Careful about that clean engine bay!! I've learned the hard way that clean engine bays are not allowed on this forum!! :lol: :lol: :lol: Splash a little dirt about the place for the next pics you take....
    [b]#[/b] 2007 D4D GX [b]#[/b] Full Privacy Tint [b]#[/b] [color=#FF0000][b] Flinders Red [/b][/color] [b]#[/b] 2 x HID LightForce 240 Blitz [b]#[/b] ARB Winch Bar [b]#[/b] Alloy Rims [b]#[/b] Hilux Washer Jets [b]#[/b] Stebel Nautilus Compact Truck Horn [b]#[/b] ARB Alloy Roof Rack [b]#[/b] ARB Dual Battery System [b]#[/b] Charcoal Rough Country Canvas Seat Covers [b]#[/b] [color=#0000FF]Suspension:[/color]Autocraft Bilstein Shocks/Struts & Ridepro Coils [b]#[/b] [color=#0000FF]L.E.D[/color] Side Marker Lights [b]#[/b] ARB Onboard Air [b]#[/b] Pirelli Scorpion LT ATR 265/70's [b]#[/b][color=#0080FF]--Custom 3"exhaust---[/color]

    Comment


    • #3
      Re: D.I.Y Spotlight Install

      Great install mate looks like a top job too nice and neat. Oh yeah as IP says, splash a little dirt around under there
      Regards,

      Big Fella

      2007 Prado GXL D-4D Auto. Black. Cooper ATR's, ARB Bull Bar, Safari Snorkel, ARB Dual Battery, Sandgrabba Mats, Black Duck Seat Covers, Plastic Bits on the front, Mesh Grill Guard, Tinted Front Windows, Towbar, Reverse Sensors, Lightforce Blitz 240's, ORS Drawer System. ScanguageII, Stebel Truck Horn, Icom 440 UHF Radio and BIlstein/Ridepro Premium Lift Kit.

      If you can't fix it with a hammer...... you have an electrical problem.

      [img]http://img.photobucket.com/albums/v655/pradovx96/Web%20photos/emailsig.jpg[/img]

      Comment


      • #4
        Re: D.I.Y Spotlight Install

        Great job Golly

        ... but as the guys have said .... you need some dirt !!! :lol: :lol:

        Come out for a little drive with us :twisted: :twisted:

        Cheers
        Chippy

        Comment


        • #5
          Re: D.I.Y Spotlight Install

          Good write up golly.

          Do you know (or could you ask your auto sparky mate) if there is any reason to cut into the Hi beam wire directly behind the main head light ?

          I have always tapped into the one inside the vehicle under the streering wheel ? I believe both are correct and will make the circuit correct but is one better than the other ??

          Cheers - Spurio
          "Ooops I just deleted the internet, lucky I was able to recover 99.7% of it out of the bin" :lol:

          Comment


          • #6
            Re: D.I.Y Spotlight Install

            all in good time with the dirt chaps, dont want to embarass myself not being prepared lmao! hahah, dont know about the feed matey, we just picked on thats all, and seamed this was easier to find being pressed for time :lol:
            [B]My 2007 D4D [COLOR=darkred]Flinders Red[/COLOR] Buildup[/B] - [URL="http://www.pradopoint.com/showthread.php?13590-Golly-s-Flinders-Red-D4D-GXL"] HERE[/URL] :cool:
            [B][COLOR=navy]K[COLOR=red]D[/COLOR][/COLOR][COLOR=darkorange]L[/COLOR] Designs[/B] (Designer for the 2009 GTG Banner) - [URL="http://kdldesigns.net/index.php/banners"] HERE[/URL] ;)
            ,

            Comment


            • #7
              I'm digging up an old thread, but in all my searching I can't the specific answer despite the number of threads detailing spot light installs.

              Does anyone know of a convenient point under the dash (120 VX) for the earth side of the switch?

              Comment


              • #8
                From memory, I found an earth bolt to the right of the accelerator pedal and under/behind the fuse panel where I earthed the switch.

                Comment


                • #9
                  Good write up and photos.

                  One thing I would have done is where you go through any metal or even plastic is to put rubber grommets in to reduce/stop chaffing.

                  Nice setup.

                  Comment


                  • #10
                    I picked up the high beam from the multipin connector at the base of the stalk in the steering column. It was a nice tip I got at the last minute. Its much neater as you don't have to muck about with the head lights and it requires only one wire through the firewall. I also found that the relay sits nicely inside the huge fuse box.

                    Comment

                    canli bahis siteleri bahis siteleri ecebet.net
                    mencisport.com
                    antalya escort
                    tsyd.org deneme bonusu veren siteler
                    deneme bonusu veren siteler
                    gaziantep escort
                    gaziantep escort
                    asyabahis maltcasino olabahis olabahis
                    erotik film izle Rus escort gaziantep rus escort
                    atasehir escort tuzla escort
                    sikis sex hatti
                    en iyi casino siteleri
                    deneme bonusu veren siteler
                    casibom
                    deneme bonusu veren siteler
                    deneme bonusu veren siteler
                    betticket istanbulbahis
                    Working...
                    X