Announcement

Collapse
No announcement yet.

Audio Upgrade

Collapse
X
 
  • Filter
  • Time
  • Show
Clear All
new posts

  • Audio Upgrade

    While the standard 150 GXL radio isn't actually too bad, and the bluetooth handsfree is actually quite good, I decided to change a few things.

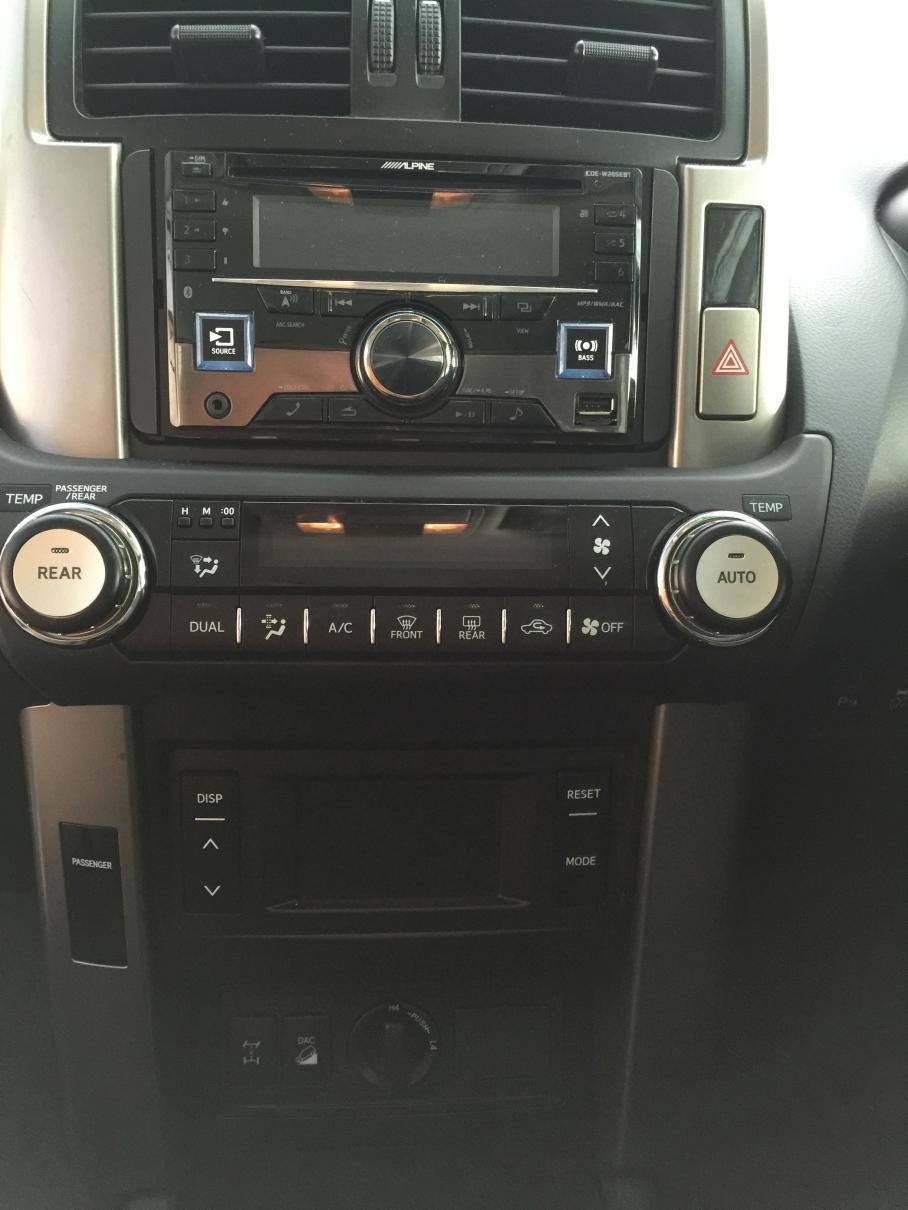
    First up was the headunit which got ditched in favour of a surprisingly affordable double din Alpine CDE-W265BT unit. I'm not bothered with watching movies in my car and I use my phone for navigation, so I don't need a full screen. I like this particular unit because it has time correction and a decent 9 band equaliser with smartphone tuning access via a free app, for under $300 when I bought it. The first one was a dud though, but JB Hifi replaced it with another new one once I figured out that it was the headunit software that was faulty.

    To make it fit I moved the standard reversing monitor to the bottom of the centre consol so that the headunit could fit in the top. This required new fascia panels for the top (that re-uses the original silver side pieces) and bottom. I also had to get the 2 thin inserts that are either side of the unit. These aren't a great fit, but after a couple of days I didn't notice it anymore. I'll probably replace them with better quality pieces at some point. All the other fascia bits are off ebay and fit very well.

    To make all of this lot work I picked up a surprisingly expensive little box of tricks from a car audio specialist that make the steering controls stock speakers, light dimmers, etc work. There are some cheap ones on ebay as well, but when I had my first go at installation they didn't maKe the steering controls work which was very important for me.


    Attached Files
    fridayman
    Senior Member
    Last edited by fridayman; 10-07-2017, 08:43 PM.
    95 3.0 Camp Car, 150 V6 Daily Driver[SIZE=4]
    [/SIZE]

  • #2
    Next on the list was some better speakers. The stock front door speakers are 6x9's, but it's quite difficult to find good quality 6x9 2-way components that aren't silly money. I've wanted to try a set of Focal components for quite a while now, so I started looking into what 6.5" 2-way Focal components I could afford. The first lot that I bought were advertised as 165V2's but they turned out to be Focal 165 V Slims, which aren't bad speakers by any measure, but not exactly what I was after. I decided to keep them and use their midbasses as fill speakers for the rear doors. After hunting around a bit I got a pair of Focal 165V30's for a very good price. These speakers look and feel very well made. Even the tweeters have a bit of weight to them. They also get great reviews online.

    To make the 6.5" drivers fit in the stock 6x9 hole, I had to make some speaker adapters. Pic below is of the passenger side front door.

    Click image for larger version

Name:	IMG_2746.jpg
Views:	1
Size:	89.2 KB
ID:	652942

    I picked up some unpronounceable 8mm plastic sheets that are resistant to just about everything but most importantly water/moisture. The plastic is also very stiff so shouldn't move/flex/vibrate at all. Here are a couple of pics of the stock speaker with its ridiculously small magnet next to the replacement driver mounted on the adapter that I knocked up. You will notice that there is also a MDF ring - I had to make these because the speakers sat a few mm too deep and obstructed the window when it is wound all the way down.

    Click image for larger version

Name:	IMG_2765.jpg
Views:	1
Size:	96.7 KB
ID:	652943

    Click image for larger version

Name:	IMG_2766.jpg
Views:	1
Size:	94.5 KB
ID:	652944

    Apart from the headunit and sub I want the install to look as standard as possible, so the Focal tweeters went into the stock location in the dash. The new tweeters need adapters to mount in the stock locations, so I made these up from the same plastic as the door driver adaptors.

    Stock tweeter

    Click image for larger version

Name:	IMG_2863.jpg
Views:	1
Size:	89.0 KB
ID:	652945

    Replacement mounted in the dash.

    Click image for larger version

Name:	IMG_2842.jpg
Views:	1
Size:	91.0 KB
ID:	652946
    95 3.0 Camp Car, 150 V6 Daily Driver[SIZE=4]
    [/SIZE]

    Comment


    • #3
      Initially I thought about putting the crossovers in the doors, but I wanted easy access to the switches on the crossovers because I wasn't sure how bright the tweeters were going to sound. I ended up putting the crossovers in the glove box, where they don't take up too much space and are very easy to get to.

      Click image for larger version

Name:	IMG_2868.jpg
Views:	1
Size:	90.0 KB
ID:	652947

      At the same time as the speakers I also fitted the amps and ran all the wiring. This can take quite a bit of time, but it is worth having patience and doing it right.

      I chose Stinger RCA's for both amps - a 4-channel Alpine for the door speakers and a Alpine monoblock for the sub. I also ran a new fused 4 gauge cable from the battery, through the firewall, to power the amps. The 4 channel is mounted under the passenger seat and the monoblock is screwed onto the back of the sub box. I kept the RCA's away from the power cables to reduce the risk of getting alternator whine. The RCA's run under the carpet down the centre of the car, and the power cables are in the floor channel on the passenger side.

      4 channel amp under passenger seat.

      Click image for larger version

Name:	IMG_2745.jpg
Views:	1
Size:	95.1 KB
ID:	652948
      95 3.0 Camp Car, 150 V6 Daily Driver[SIZE=4]
      [/SIZE]

      Comment


      • #4
        So the big question, how much of a difference? I spent a lot of time and money on my last car for what turned out to be minimal improvement
        [B]Steve[/B]

        2010 Silver GXL Prado 150, D4D Auto, with a few non standard bits

        Comment


        • #5
          Sound deadening?

          Comment


          • #6
            Originally posted by krypto View Post
            So the big question, how much of a difference? I spent a lot of time and money on my last car for what turned out to be minimal improvement
            Just the headunit made a difference as it has significantly more power than the stock radio where the sound quality drops off quite quickly when you turn it up a bit. I'm not talking window shaking loud, even from moderately loud volumes the quality drops off. The aftermarket unit also has time correction which makes a big difference, and the 9 band equaliser which allows you to fatten the lows and mids a bit and I took a smidge off the highs.

            When I added the aftermarket speakers it made a big difference again, especially in the mids and highs which have much more clarity. With the improved clarity you tend to listen a bit louder as well - I didn't realise that I did this, but I used to keep the volume down because the quality would drop off. With the new headunit and speakers it was much better, but everyone says that decent speakers need an amp to get the best out of them, and it's certainly true for these Focals. I only have the fronts wired to the amp at the moment, but I was VERY surprised at what a difference the amp made. It's difficult to describe how much difference it made, but it is even more clear and the mids have improved again. With the sub added you can't even compare it with the stock system anymore. I will wire in the rear speakers as well when I have a weekend free, but it is sounding pretty good already.

            Originally posted by RanJ View Post
            Sound deadening?
            This is work in progress at the moment. From the first day that I owned this car I was disappointed by how much like a big coffee tin this car sounds when you close the doors. So I've started on the front doors where I have added deadening to the outer skin.

            Click image for larger version

Name:	IMG_2845.jpg
Views:	1
Size:	89.9 KB
ID:	652951

            Getting the factory moisture barrier off was a bit of a pain, until I discovered how well brake cleaner works on the butyl type glue that they use.

            Click image for larger version

Name:	IMG_2748.jpg
Views:	1
Size:	86.2 KB
ID:	652950

            I've sealed the top access hole in the inner skin with some sticky back aluminium sheeting.

            Click image for larger version

Name:	IMG_2843.jpg
Views:	2
Size:	96.2 KB
ID:	652952

            The doors already sound much nicer when you close them, and there is much less sound escaping from the car - even at moderate volumes you can barely hear it outside the car.

            Next I want to seal the bigger access hole, but I'm still thinking about how I want to do this. The challenge here is, what I think is some impact protection, that is part of the door card. The honeycomb and foam bits protrude reasonably far into the access hole. I don't really want to trim this stuff off if it is impact protection, so I'm still working out how I fill the hole with something that will be stiff enough not to vibrate or resonate. Here you can see the how the standard orange moisture barrier has an extra blue bit that protrudes inward to allow for this.

            Click image for larger version

Name:	IMG_2747.jpg
Views:	1
Size:	85.7 KB
ID:	652953

            I will be sticking fatmat all over the inner skin as well once I figure this out. And I have some acoustic foam that will go over the fatmat.
            95 3.0 Camp Car, 150 V6 Daily Driver[SIZE=4]
            [/SIZE]

            Comment


            • #7
              Sounds like a plan!

              I've always found those Focal tweets a little on the bright side. To the point where i use the pad switch to bring them all down.

              Comment


              • #8
                I have only done the front - Focal 6x9's with a big 2ch amp, sounds great, but all the sound is in the front, need some more sound towards the rear, as the rear speakers are lost.

                So thinking i'll upgrade the rear and add a sub also, how have you gone about installing the sub?

                Comment


                • #9
                  Word of warning with FatMat. Next warmish day... leaving the windows open a touch as it starts to smell

                  Comment


                  • #10
                    Originally posted by Rooballer View Post
                    I have only done the front - Focal 6x9's with a big 2ch amp, sounds great, but all the sound is in the front, need some more sound towards the rear, as the rear speakers are lost.

                    So thinking i'll upgrade the rear and add a sub also, how have you gone about installing the sub?
                    When I chose my sub I wanted 2 things, sound quality and it had to be removable. I almost went with an Image Dynamics 10", but got a great deal on a 10" DLS. I haven't been disappointed. It's currently mounted in an old free standing enclosure with a FAST plug. The RCA, power and switch cables are run in the channel on the passenger side of the car and come out at the back of the trim next to the rear passenger seat. The sub sits behind the middle row seats facing the back. The amp is mounted on the back of the sub enclosure. For the time being I've used an old carpeted enclosure, but I intend to build a new one as per the DLS advised specs.

                    Originally posted by RanJ View Post
                    Word of warning with FatMat. Next warmish day... leaving the windows open a touch as it starts to smell
                    We've had a few warm days since I installed it on the outer skin, so I'll take a look and see how it has held up when I finish sealing the holes in the inner skins.
                    95 3.0 Camp Car, 150 V6 Daily Driver[SIZE=4]
                    [/SIZE]

                    Comment


                    • #11
                      It's been a while but I have a bit of an update. Firstly I finished the sound deadening on the inner door skins. I found a sticky back aluminium sheet that seemed to be a good compromise between stiffness and being easy to shape. On the front doors I used this on the top opening only. For the bigger bottom opening I struggled to figure out just how deep the honeycomb impact protection extended into the hole, but as best I could tell it got pretty close to the glass when the window was down. So for the bigger hole I ended up with a layer of Fatmat only.

                      Pic of aluminium sheeting in place.


                      Pic of the the whole inner skin deadened.


                      All this was done a few months ago with pretty good results. But as always I was curious... this time about what difference additional accoustic damping would make. So over the last couple of days I also added some foam sound insulation. It wasn't the most expensive money could buy, but it is surprisingly heavy which is often a good sign in sound deadening.

                      This is the stuff - basically a thin layer of material sandwiched by medium density foam. I still can't believe how heavy it is for something that just looks like sponge!


                      The other thing that I did at the same time was to extend the rings on the door cards that are intended to keep the sound from escaping into the space behind the door card. The original speakers have a plastic, foam lined ring that extends from the speaker which fits snuggly into the plastic ring in the door card. I suspected that this played a large part in the puny stock speakers sounding as good as they did, for what they were.

                      Pic of stock rear speaker (the fronts had the same thing).


                      Rather than trying to attached rings to the speakers like the stock setup, it was much easier to just add a ring of sticky back high-density foam to the rings protruding inward in the door cards.

                      Attached Files
                      95 3.0 Camp Car, 150 V6 Daily Driver[SIZE=4]
                      [/SIZE]

                      Comment


                      • #12
                        And here is a pic of one of the lined rear door cards ready to go back on.


                        BTW, the Fatmat has held up extremely well and hasn't smelled or peeled at all.

                        While I hadn't really had the chance to realise the full potential of the DLS sub in a purpose built box (I had it in a cheap & nasty enclosure that was meant to be temporary), a 12" Image Dynamics sub came up at a price that I couldn't refuse - these subs are renowned for their musicality, as opposed to outright SPL output which isn't my thing. When I looked around for a decent enclosure to house this sub I couldn't find anything that I liked so I decided to build one myself. With sub boxes the 3 most important things are: first to have the right volume for your particular sub (they will be provided in the instructions for any decent sub); second the box must be rigid (big subs will flex most ebay boxes and lose sound quality); and third it must be air tight for a sealed enclosure (for ported boxes the port length and diameter are important). There are quite a few online calculators to help with this and it also helps to use something like Sketchup to draw it up first and get all the measurements exactly right.

                        Here are all the bits cut out of 18mm MDF and ready for assembly.


                        The box is braced in all the corners (where 2 panels are joined), and all joins are glued & screwed (with glue in the pre-drilled holes) and then silicone sealed. On the outside I sealed all the seams with a rubber spray. I also made the front hole for the driver super tight fitting - when I test fitted it, it fitted so well that I struggled to get the driver out again without marking or damaging it. The end result is a perfectly sized box that is VERY rigid and absolutely air tight (and VERY heavy!). When I ran it for the first time I nearly shat in my pants though when it made a rattling sound - I thought I had bought a stuffed sub. It turned out to be the screw holes. The sub is secured to the face of the box with bolts into captive wood nuts, and for the test run I had only inserted half of the bolts - the rattle was air pushing through the open screw holes.


                        You'll see that the front face is slanted backwards - this is to prevent standing waves forming in the box. There are mixed thoughts about this due to the length of sub frequency waves being so long, but it can't hurt. To further prevent any internal sound reflections I stuck some fatmat to each surface, then lined it with 2 layers of packing blanket, and some egg crate accoustic foam behind the driver on the back panel.


                        Once I was happy that it all worked as it should, I also carpeted it with matching grey auto carpet. I am pretty happy with the end result.


                        Was it worth the effort. Absolutely! The sub sounds superb, low and clear without being boomy at all, and it blends perfectly with the door drivers. I'm very pleased with the overall results so far. The last thing is to tune the whole setup. While I bought the HU because it has a 9 band equaliser, I recently acquired a Minidsp UMIK-1 and loaded the REW analysis software. I did the best that I could with 9 bands to smooth the frequency curve, but it soon became obvious that 9 bands are good but insufficient to get it as good as it could be (there are too many frequency dips and peaks that need flattening). So I might go find that 3Sixty dsp hidden in the shed that I've also been itching to play with...
                        Attached Files
                        fridayman
                        Senior Member
                        Last edited by fridayman; 10-07-2017, 10:24 PM.
                        95 3.0 Camp Car, 150 V6 Daily Driver[SIZE=4]
                        [/SIZE]

                        Comment


                        • #13
                          I forgot to mention, if you are going to sound deaden your doors, it is well worth fitting the isolating rings and the extra accoustic insulation. The improvement in clarity, esp midbass is remarkable.
                          95 3.0 Camp Car, 150 V6 Daily Driver[SIZE=4]
                          [/SIZE]

                          Comment


                          • #14
                            fridayman
                            Senior Member
                            fridayman This is a great thread! Thanks
                            2010 GXL V6 - Point Cook, Victoria
                            Gavin

                            Comment

                            canli bahis siteleri bahis siteleri ecebet.net
                            mencisport.com
                            antalya escort
                            tsyd.org deneme bonusu veren siteler
                            deneme bonusu veren siteler
                            gaziantep escort
                            gaziantep escort
                            asyabahis maltcasino olabahis olabahis
                            erotik film izle Rus escort gaziantep rus escort
                            atasehir escort tuzla escort
                            sikis sex hatti
                            en iyi casino siteleri
                            deneme bonusu veren siteler
                            casibom
                            deneme bonusu veren siteler
                            deneme bonusu veren siteler
                            betticket istanbulbahis
                            Working...
                            X