 Tweet
Tweet
Nicely done.
-
My 150 build - http://www.pradopoint.com/showthread.php?27423-A-Random-approach-to-a-Bluestorm-150-GXL-D4D-automatic -
I then routed the cable up along the inside of the passenger front kick panel, between the body and the factory wiring harness plugs etc.
It took quite a bit of time to do this neatly and in hind site i think id just run it on the outside of the factory wiring plugs etc.
It then enters the engine bay via the large rubber grommet with the factory wiring loom, it then runs around the rear of the engine bay with the factory wiring loom, then down the drivers side quarter panel and to the Auxiliary battery all in split conduit.
I have installed a 60A Maxi fuse at the Auxiliary battery to protect the twin core twin sheathed 8GA wire.
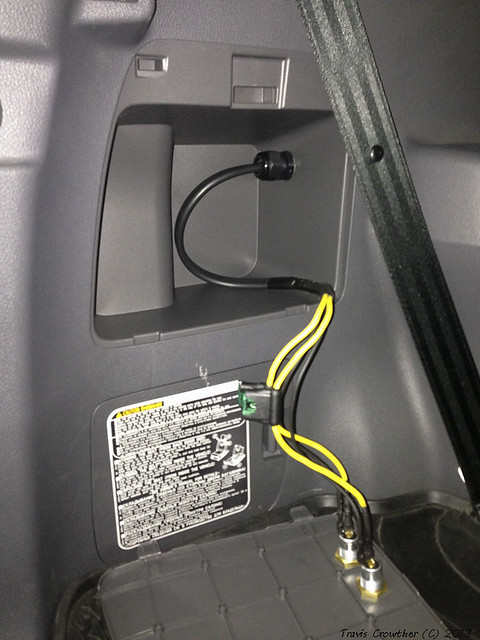
Back in the boot, i decided to mount two Merit / Hella sockets in the panel above the Jack compartment. So i drilled a hole in the side and fitted a grommet for the twin core twin sheathed 8GA wire to pass through where i then joined two thinner gauge pairs of wires which connect to the sockets. Each socket is individually fused also.

No modifications were done to any of the skid plates at the front or rear doors. They were refitted with no problems and all clips locked back into place.
Travis.Last edited by Alpinebully; 28-07-2013, 09:45 PM.His: 1978 FJ45
Hers; 2012 Prado 150 GXL D4D Auto.
[URL="http://www.pradopoint.com/showthread.php?28593-Michelles-2012-150-Prado-GXL-D4D"]http://www.pradopoint.com/showthread.php?28593-Michelles-2012-150-Prado-GXL-D4D[/URL]Comment
-
Well, Michelles Prado has finally seen a little red dirt.
We've just returned from a quick little holiday out and around the Flinders Ranges.


Travis.His: 1978 FJ45
Hers; 2012 Prado 150 GXL D4D Auto.
[URL="http://www.pradopoint.com/showthread.php?28593-Michelles-2012-150-Prado-GXL-D4D"]http://www.pradopoint.com/showthread.php?28593-Michelles-2012-150-Prado-GXL-D4D[/URL]Comment
-
That would be a hell of a lot more comfortable than the old FJ. No more wet towels to cool you down anymore!Originally posted by Alpinebully View PostComment
-
top photos of the Flinders, makes me homesick, lived around Northern Flinders most of my life, in fact popped the question to my wife on St Marys.
Cheers DerekBlue Storm 150 GXL 4D4 PRADO and 2014 Cub Brumby Camper My rig build [url]http://www.pradopoint.com/showthread.php?25698-Derek11-s-2012-Blue-Storm-150-GXL-build-up[/url]
Comment
-
Hey guys, got another new accessory for Michelles Prado.
I picked up the Autosafe Cargo barrier that was on ebay this week. Great seller, with a really nicely tricked out Prado 150 himself, who had to get a custom 1/2 barrier made up to suit his new draws hence he was selling the full size barrier he had installed previously.
Barrier came with everything inc. the fit kit and instructions however i could tell straight away that this 'kit' wasnt going to be a simple bolt on job. Well half of it at least.
The top mounting brackets were an easy 5 minute job however the bottom mounts, well they simply do not and will not work at all. Autosafe supplies a couple of "Z" brackets to mount off the tabs welded on the bottom of the cargo barrier and they are then said to be fixed to the car via the wheel arches. This is all well and good except the plastic trim that is inside the car contains a large void area and the metal wheel arches themselves are a good 6-8 inches away from the interior plastic trims.
To make it a little worse, on the drivers side where the rear air con duct is, (not sure if it is an inlet or outlet - but i mean that little vent down at foot level towards the front of the drivers side interior wheel arch panel) well that is exactly where the drivers side "Z" bracket would bolt through if i tried to fit is using the supplied brackets.
So best i can tell, even if i made up some longer brackets myself, all i could attach the brackets to, would be the plastic trim (and use large 'mudguard washers' to spread some of the load). Far Far Far from ideal.
I tried calling Autosafe today but after i explained the problems with the proposed fitting method as per their kit and instructions i was told their installer isnt in today so i will have to call back tomorrow.
Id love to hear from anyone who's fitted a barrier to their 150 Prado - regardless of brand, how do the lower brackets attach to the car? Ive read all the threads here on prado point and seen all the pictures but i cannot clearly tell how and what the bolts are attached to on the side interior trim panels. Surely they are not just bolting to the plastic trim with a big washer??? Is an internal bracket made up to 'bridge' between the metal body of the vehicle and the trim to take the load etc.....??
Any help would be greatly appreciated. I will update this thread when i hear from the installer at Autosafe tomorrow hopefully. Im a little dubious about what is done, the bloke today confirmed i have the right kit and nothing has changed. But the fact remains that their instructions are wrong, and cannot / will not work as written.
Travis.His: 1978 FJ45
Hers; 2012 Prado 150 GXL D4D Auto.
[URL="http://www.pradopoint.com/showthread.php?28593-Michelles-2012-150-Prado-GXL-D4D"]http://www.pradopoint.com/showthread.php?28593-Michelles-2012-150-Prado-GXL-D4D[/URL]Comment
-
Not a 150 I know, but my Autosafe barrier in my 120 has brackets that attached to the rear tie down points. The top uses a bracket attached to where the grab handle is. The beauty of this system is no drilling. And it doesn't move at all.
Maybe the 150 had to be different due to the rear seats folding down into the floor.NOW FOR SALE!!! - 2004 Silver GXL 3lt 4spd Auto - ARB Bullbar, Safari Snorkel, Redarc Dual Battery System, Cooper ST MAXX, Dark Tint, IPF900XS spots, Raised Bilstein/Kings Suspension/Firestone Airbags, Autosafe Cargo Barrier, Sandgrabbers, Rola Roof Rack Stuff, Insect Screen, Dust/Wind Deflectors, Sheepskin/Black Duck Seatcovers, GME TX3510, ARB underbonnet compressor, Allied Hammer Rims, ARB UVP, [url="http://www.pradopoint.com/showthread.php?18043-Rock-sliders-steel-side-steps"]AJ Sliders[/url]Comment
-
Hi Madkore, thanks for the thought - yeh i saw how the 120's were mounted and honestly i think id prefer that to the 150's but i havent seen any manufacturer use the floor for the bottom brackets on the cargo barriers they all seem to use the side rear wheel arch area.
I called Autosafe again today and spoke to their installer. I mentioned my thoughts and he said that i needed to drill through the lower air vent and "if i drill in the right spot the Z brackets will work and they will be mounted through the metal wheel arch not just plastic".
I mentioned the mounting bolts for the Z brackets were only 30mm long, and again he said if i do it in the right spot thats all i'll need. I cannot for the life of me picture any position that the Z bracket could be put in (they are only very short brackets - couple inches long), to make them work and get close enough to the actual wheel arch behind the plastic trims in the vehicle... And im not to fond of the idea that i need to drill a hole through the vent..
Ill hopefully get this sorted over the weekend when Michelle isnt using her car.
Travis.His: 1978 FJ45
Hers; 2012 Prado 150 GXL D4D Auto.
[URL="http://www.pradopoint.com/showthread.php?28593-Michelles-2012-150-Prado-GXL-D4D"]http://www.pradopoint.com/showthread.php?28593-Michelles-2012-150-Prado-GXL-D4D[/URL]Comment
-
Hi there I have one of these and not installed yet , just read and went to check out my install kit and I have 90mm bolts to go with my z brackets with spacers to go between the trim and arch. This kit and barrier came for autosafe and is for the prado 150 full barrier.Originally posted by Alpinebully View Post
Thanks
Jason2012 Altitude Graphite Prado 150 TD Auto, Eaton lockers front/rear, ironman bullbar, protection plates including fuel tank, Powerful 4x4 roofrack, maxtrax x 4, dual batteries, dual fuel filters, Dobinson 50mm lift, rear swaybar extensions, swaybar relocation plate, safari snorkel, 100w hid lightfore gensis, 35w hid low beam 55watt hid high beam, 3inch taipan exhaust, brown davis long range tank, dpchip, roo systems sliders, wind booster.Comment
-
Hi Jason,Originally posted by 2007jchill View Post
Thanks for replying. Your kit sounds quite different to what i have. 90mm bolts sound a little more like what i think it would take to reach the metal wheel arch underneath the plastic trim. Would you possibly be able to take a photo of the kit you have, or specifically the Z bracket and the spacers?
There are no spacers mentioned in the instructions i have, and they are not listed on in the Kit contents list.
I had a look last night at my wifes car and there is no way it will work with the kit i have and as per the kits instructions.
The Part number on the fitting instructions sheet i have is; CBTP10GX
Model; Prado 150
Year of Manufacture; 11/2009 Onwards
The instructions for fitting the Base are: Secure one end of the 29Z bracket to base tag on cargo barrier so that the free end of the bracker is towards the plastic trim on the wheel arch using an m10x20mm set screw and m10 whiz nut.
Project the 29Z bracket straight back to the rear of the vehicle and mark where the 29Z meets the wheel arch of the vehicle. Drill the mark through the plastic only out to 16mm. Locate where it needs to be drilled through the wheel arch panel using a pilot drill bit, drill through the wheel arch. Drill the pilot hole in the wheel arch out to 10mm. Secure the end of the 29Z bracket into the drilled out hole using an M10x30mm set screw and an M10 mudguard washer (run a bead of silicone around the M10 mudguard washer before securing) on the outside of the vehicle.
Thanks again Jason for replying, it confirms my thoughts 100% - something isnt right with the kit i have. I will try calling Autosafe again with this new information and i think ill have to take a drive down to their factory.
Travis.His: 1978 FJ45
Hers; 2012 Prado 150 GXL D4D Auto.
[URL="http://www.pradopoint.com/showthread.php?28593-Michelles-2012-150-Prado-GXL-D4D"]http://www.pradopoint.com/showthread.php?28593-Michelles-2012-150-Prado-GXL-D4D[/URL]Comment
-
Hi TravisOriginally posted by Alpinebully View Post
I installed mine today the brackets I have will work but I have decided to not drill wheelarch and I am going to attach bottom tabs to my draw system. Travis half your instructions are missing as you can see with the photos a have attached
Jason2012 Altitude Graphite Prado 150 TD Auto, Eaton lockers front/rear, ironman bullbar, protection plates including fuel tank, Powerful 4x4 roofrack, maxtrax x 4, dual batteries, dual fuel filters, Dobinson 50mm lift, rear swaybar extensions, swaybar relocation plate, safari snorkel, 100w hid lightfore gensis, 35w hid low beam 55watt hid high beam, 3inch taipan exhaust, brown davis long range tank, dpchip, roo systems sliders, wind booster.Comment
-
Hi Jason, thanks for that its greatly appreciated.
Looks to me like they might have updated the instal kit and instructions OR the kit i have is for a different model of 150 Series Prado.
The kit i have IMO is complete, but IMO it is not the right kit for a GXL 150 Series.
Thanks again, looks like i now know the issue 110%, ill get back in touch with Autosafe later today and see if i can get these spacers etc. Otherwise ill make something up myself - im leaning towards this anyways now as i dont want to drill through the bottom air vent.
Travis.His: 1978 FJ45
Hers; 2012 Prado 150 GXL D4D Auto.
[URL="http://www.pradopoint.com/showthread.php?28593-Michelles-2012-150-Prado-GXL-D4D"]http://www.pradopoint.com/showthread.php?28593-Michelles-2012-150-Prado-GXL-D4D[/URL]Comment
-
Hey guys, well before ive finished one project ive just started another
Ive been wanting to fit a fuel water separator to Michelles car since the day she bought it and ive finally made a start towards making that happen.
I dropped into the local CAT business today and purchased these items as per the CAT thread here on these forums.
http://www.pradopoint.com/showthread...The-Full-Story
Caterpillar Parts;
1 x Fuel/Water Seperator Assy - 144-9962
2 x plugs required to blank two of the four ports on above assy - 3K-8460
2 x O-rings to seal above plugs - 1J-9671
4 x 10mm fuel hose clamps - 1P-4278
2 x 8mm mounting bolts - 8T7547
2 x Washers - 5P-4116
2 x Lockwashers - 3B-4505
These items came to $119.00 FWIW.
Now i just need to get some hose and the Hose fittings be it Banjo - Barb style or the Speed flow fittings (Ill see what i can find tomorrow locally).
.......................................
Also for what its worth i asked the guys in the CAT spare parts area about the filters available for this filter following the information in post #29 of the thread linked above in this post..
CAT 156-1200 91.4mm (3.6") 5
100-6374 91.4mm (3.6") 30
138-3100 91.4mm (3.6") 150
I can confirm that the 30 micron filter is no longer available and their system indicated the 150micron filter as the replacement.
So the only CAT filters available from CAT now are these 2; 156-1200 and 138-3100.
Travis.His: 1978 FJ45
Hers; 2012 Prado 150 GXL D4D Auto.
[URL="http://www.pradopoint.com/showthread.php?28593-Michelles-2012-150-Prado-GXL-D4D"]http://www.pradopoint.com/showthread.php?28593-Michelles-2012-150-Prado-GXL-D4D[/URL]Comment
-
Hey guys, well Michelles Prado now has the fuel water separator fitted. The instillation was pretty straight forward, however i was quite apprehensive about messing with such a new and fancy vehicle lol.
I was quite worried about getting an air lock in the fuel but it seems to have all worked without any problems.
The filter is a tight fit, and it is rather fiddly fitting the hoses to the barbs and fitting the connections to the filter in place. I took my time and carefully tried to work out the lengths of hoses id require and where they would sit, and where they would require some fastening to avoid any potential rubbing causing wear in the future.
I decided to go with the Speed Flow fittings to attach the 3/8" hoses to and between the filters. These were by far the nicest and best quality fittings i found, and the cheaper ones were still approx $50 anyways and they were up to twice the size of the SpeedFlow fittings, the bits i was quoted for from Enzed would simply not have fitted in the tight space avaliable.
The fittings you need from Speed Pro Australia are:
S703-06P x 2 @ $8.73each +gst
S403-06P x 2 @ $28.70each +gst.
I also found that i needed to buy 2 additional O-Rings (the same as the original 2 from CAT - you need 2 more O-Rings to use on the SpeedFlow S703-06P adapters where they screw into the CAT filter housing).
Also if you use the SpeedFlow fittings you do not need 4x hose clamps as these fittings do not require clamps (if used with their Hoses - i bought 1m of hose from them at the same time - $12).
So to amend the parts list now that ive finished the job this is exactly what is required...............................
From CAT:
1 x Fuel/Water Seperator Assy - 144-9962
2 x plugs required to blank two of the four ports on above assy - 3K-8460
4 x O-rings to seal above ports - 1J-9671
2 x 10mm fuel hose clamps - 1P-4278
2 x 8mm mounting bolts - 8T7547
2 x Washers - 5P-4116
2 x Lockwashers - 3B-4505
Approx $120.
From SpeedPro - SpeedFlow:
2 x S703-06P
2 x S403-06P
1m of 3/8 fuel hose.
Approx $95.

Again, its a tight fit but it does fit. The filter can be accessed and changed without needing to unbolt the housing from the vehicle. No additional brackets are needed, the CAT filter housing bolts straight to the vehicle using existing captive nuts that are there from the factory.
Its a 5 minute job to mount the housing, i then spent about 30minutes deciding where id run the hoses and spent another 30minutes plumbing it up and messing around then lastly i spent about 30minutes running the vehicle and test driving it to make sure there were no air lock issues. Im notorious for standing around looking at things Someone experienced with this stuff would knock it over in 30minutes easy.
Travis.His: 1978 FJ45
Hers; 2012 Prado 150 GXL D4D Auto.
[URL="http://www.pradopoint.com/showthread.php?28593-Michelles-2012-150-Prado-GXL-D4D"]http://www.pradopoint.com/showthread.php?28593-Michelles-2012-150-Prado-GXL-D4D[/URL]Comment
-
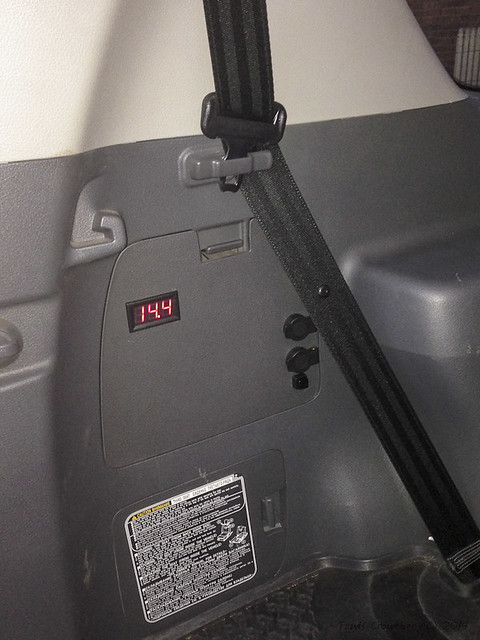
Hey guys, i added a small voltage gauge to the panel in the back beside the hella sockets id fitted earlier. The gauge can be switch on and off by the small switch underneath the sockets.
Travis.His: 1978 FJ45
Hers; 2012 Prado 150 GXL D4D Auto.
[URL="http://www.pradopoint.com/showthread.php?28593-Michelles-2012-150-Prado-GXL-D4D"]http://www.pradopoint.com/showthread.php?28593-Michelles-2012-150-Prado-GXL-D4D[/URL]Comment
Comment