Do they look like the ones in post # 191 in this thread?
http://www.pradopoint.com/showthread...-Points/page20
The elongated hole was in my original set too, it's the shape at the top mounting points that has changed.
-
Hi Fido,
Sorry if there was any confusion re: the roadsafe front recovery points, nothing confirmed but by latest what i mean is to me they appear to be the latest version that ive read about on the forums here and on the roadsafe website. They have the elongated hole for the shackle to pass through, ground back section (i think, i wouldnt know for sure until i try to install them?) and come with 6 sets of bolts and the nuts with the mounting plate / wire thingumabobs IIRC. Purchased this week from e4WD in Cranbourne Vic. Bloke at the shop mentioned the elongated hole for the shackle being the latest change, i read about the back shape change here on PP and coming with 6 sets of the mounting hardware was mentioned on the Roadsafe website (earlier kits were sold with 4?) So i just assumed what i have is the current release from Roadsafe, and im hoping i dont have any issues fitting them
Travis.Leave a comment:
-
Nice, my Kakadu had one of those but somewhere between the previous owner and me it got swapped for a TJM T13. Nothing wrong with the TJM per se but they also took the winch that was on the ARB bar and I quite liked the look of the Sahara without the headlight hoops.Originally posted by Alpinebully View Post
What do you mean by "latest"? I'm still waiting on Roadsafe to replace mine with the new slightly modified design. My Kakadu has been the guinea pig as some TJM bars were giving issues with fitting them, ARB bars were fine AFAIK.Next up, fitting bull bar + the latest 'Roadsafe' front recovery points. TBC.Leave a comment:
-
Hi guys, well what a passed 24hours!
I didnt think Michelle would be getting a bull bar any time soon (as in not in 2013), but what else is a bloke to do at 2am when feeding the bub but locate and buy a mint condition ARB Sahara bull bar for his wife.
So, right now in the back of my old Landcruiser sits all of the bits and bobs that make up the ARB Sahara Bull Bar kit. Holy cow there are a lot of components!
Next up, fitting bull bar + the latest 'Roadsafe' front recovery points. TBC.
Travis.Leave a comment:
-
So, tonight i set about wiring up Michelles dual battery system. As per my original post, in the end i went with the ARB tray, Redarc SBI12 Isolator and the AC Delco DCM24SMF battery.
The tray installation was very basic, the A/C hard line bracket needs to be loosened where it bolts to the body and 'slid' towards the front of the vehicle about 8-10mm. (The mount is designed such that this is possible with zero modifications required, just loosen the one nut, push the mount forward (towards the front of the vehicle) as far as it goes then re-tighten the nut).
When positioning the battery tray you need to pay attention to the small rubber hoses (windscreen washer bottle lines? and the bonnet release cable) and make sure they are clear and wont rub or bind between the tray and the body. There is enough slack in these objects to push them clear and cable tie them if required in the location you are happy with.
All in all, it is quite a tight fit, but it all fits in neatly with approximately 3-5mm clearance around the battery (from the guard, A/C line and the isolator when it is bolted up on the tray beside the battery).
I had some off cuts of cable laying around so i used what i had. It was 2GA wire - 26mm^2. Terminals were Utilux 25mm^2 8mm lugs from Middys. (About $1.50ea - much cheaper then most Auto retailers sell them for, even cheaper at trade prices). All terminals were crimped with a hydraulic crimper, ends covered in heat shrink then put into split conduit.

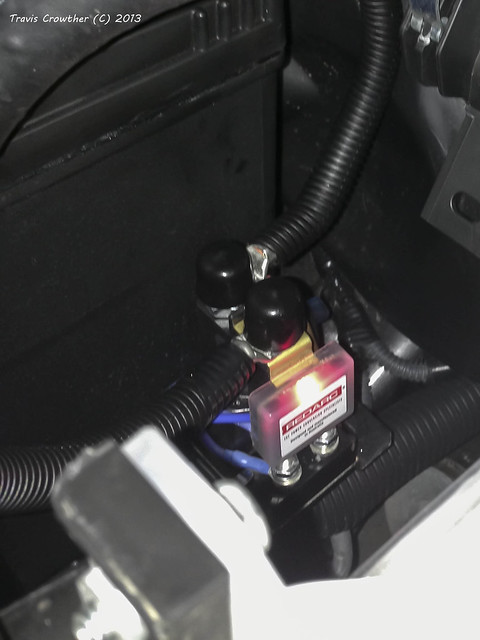
Last but not least, the Aux battery ground cable location... I searched and searched here but couldnt locate any information on where everyone was attaching the new ground cable so i chose an existing location with a hole and captive nut behind it on the guard. Using a dremel tool i carefully took the paint off and back to bare metal in the area where the lug would be bolted to.
Despite what a lot of people suggest IMO i do not agree with running a heavy gauge ground cable back to the Main battery. 99% of the time it is fine but doing so can introduce / create ground loop interference issues thus as a rule i generally avoid it.

Travis.Leave a comment:
-
Thanks for the kind words guys.
mjrandom, Labor day long weekend this year we were camped out of Woods Point.
Aprils second camping trip out was about 500m down stream of that last photo, at Easter.

Fonty, glad you enjoyed checking out some of our previous trip reports. I'll be sure to put up any future Prado based reports here
Travis.Leave a comment:
-
Welcome and good to see PP has given you some good info already. I look forward to seeing how your 150 comes out. Whereabouts is that photo taken? Looks a great spot.Leave a comment:
-
If i may share some of my passed trip reports with you guys please have a look at them if you havent seen them before.
I very much enjoy putting them together however generally only do so for the bigger once a year outback adventures
My wife and I spend a lot of time in the Victorian High Country and while we tend to get out by ourselves, now that we have the little one i wouldnt mind getting out with others in a similar position.
2009 - Innaminka
http://forums.overlander.com.au/view...p?f=19&t=73376
2010 - Kimberley. No trip report but pics are here along with lots of others.
http://forum.ih8mud.com/40-55-series...an-photos.html
2011 - Simpson
http://forums.overlander.com.au/view...p?f=19&t=73335
2012 - Cape York
http://forums.overlander.com.au/view...p?f=19&t=76610
Travis.Last edited by Alpinebully; 30-06-2013, 09:09 PM.Leave a comment:
-
Michelles 2012 150 Prado GXL D4D
Hi guys, ive been quietly sitting back and keeping any eye on this forum for a while now with the expectation that it would be very useful when the time comes and i begin working on my wifes Prado.
My wife and i have just had our first child, a little baby girl and thus my old Landcruiser Ute will be stepping down from the primary use vehicle on camping trips etc. but before it can be retired to boys trips only we need to get Michelles car up to scratch.
We purchased the Prado new late last year but up until now it has remained completely stock.
This was Michelles first trip out with the Prado along with our little baby girl. Bubs was 3 weeks old. Labor day long weekend.
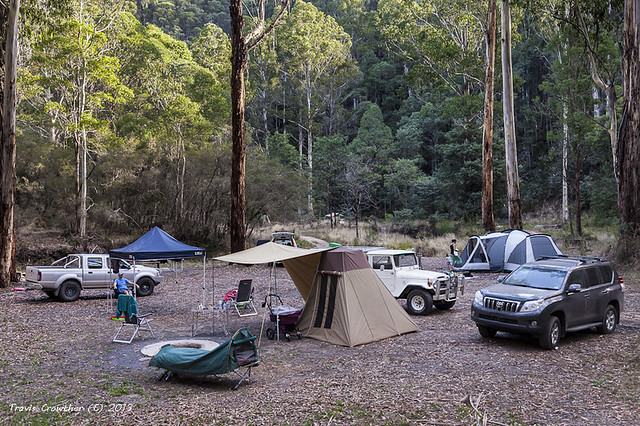
Notice, i had my old Landcruiser along for the trip also, as the Prado isnt setup to go out solo just yet.
The first item on the list for us is setting up a dual battery system and running some power down to the back for a few sockets for the fridge etc.
After researching here on Prado point i decided i would try and fit a 12" (std. N70Z) 4x4 battery in the Auxiliary battery location of the engine bay. However upon receiving the battery tray i discovered a number of issues with the tray and added together with the amount of bending required of the hard A/C lines i decided to return the faulty tray for a refund and purchased the ARB tray and a new, smaller battery. The AC Delco DCM24SMF.
Ive also purchased the Redarc SBI12 Isolator to install on the ARB tray and also thanks to the information on this forum ive purchased the Voltage Booster replacement fuse from LeighW. As a matter of fact i just installed the replacement fuse today and its performed exactly as designed. Prior to fitting i measured 14.01V at the battery terminals with the engine started and running for a few minutes. Fuse replaced and the voltage now measures 14.50V. I was rather shocked by the state of my wifes factory (less then 12months old) cranking battery as i found its rested voltage (rested overnight) to be 12.10V this morning before i ran the engine...
I will continue to monitor this now that im aware something could be up, but i think this is just further evidence that these modern 'smart' alternators are not looking after the vehicles battery(s) at all, and with the installation of LeighW's voltage booster hopefully the battery(s) will be maintained a little better.
Thanks again for the information shared here, its been a big help to me so far and i hope that i can share my own experiences here and help out other members as well.
Travis.
Leave a comment: