Announcement

Collapse
No announcement yet.

Spilsy's 2013 White GXL Build Up

Collapse
X
 
  • Filter
  • Time
  • Show
Clear All
new posts

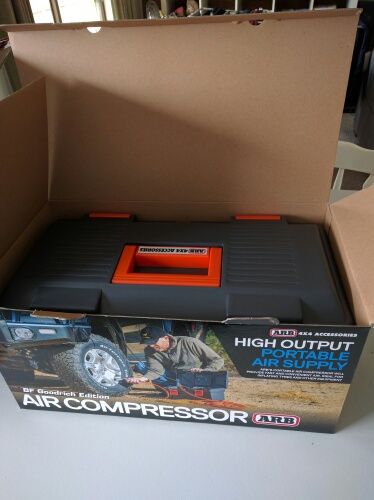
  • So, this arrived today (Note this is a "BFGoodrich Edition" - no idea what is different...):


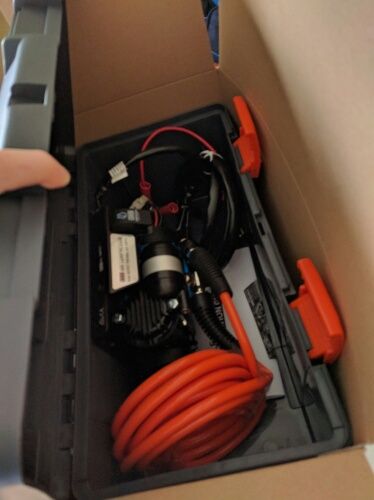
    I think I will install it in the engine bay, where a 2nd battery would usually go (seeing as my 2nd battery is in the rear). Thoughts??
    Spilsy
    Avid PP Poster!
    Last edited by Spilsy; 02-09-2016, 12:42 PM.
    Spilsy
    Today is the tomorrow you were shitting yourself about yesterday - Billy Thorpe

    Comment


    • Mate check out AMT's bracket. It tucks the compressor neatly away at the rear passenger side of the engine bay.
      Nothing wrong with drivers side in front of headlight too of course.
      Cheers
      Micheal.

      2008 GXL D4D Auto. GOING... GOING... GONE
      2015 GXL 1GD Auto. And it begins again...

      Comment


      • Originally posted by 120D4D View Post
        Mate check out AMT's bracket. It tucks the compressor neatly away at the rear passenger side of the engine bay.
        Nothing wrong with drivers side in front of headlight too of course.
        Have been contemplating the bracket. I have to check how it fits with my VSR and CB for my 2nd battery.

        Spilsy
        Today is the tomorrow you were shitting yourself about yesterday - Billy Thorpe

        Comment


        • Has anyone ever taken the toolbox mounted compressor and made it an under bonnet compressor? How'd you do it?
          Spilsy
          Today is the tomorrow you were shitting yourself about yesterday - Billy Thorpe

          Comment


          • You would need to get Part no 320101 from ARB which is item 22 in https://www.arb.com.au/assets/air-lockers/3-04.pdffor $30.88

            Comment


            • Originally posted by amts View Post
              You would need to get Part no 320101 from ARB which is item 22 in https://www.arb.com.au/assets/air-lockers/3-04.pdffor $30.88
              I'm wondering if I can drill out the rivets holding the compressor mounting plate to the toolbox and transfer that straight into the engine bay.


              Not sure if the switch will survive living under the bonnet. I can move that though.

              Spilsy
              Avid PP Poster!
              Last edited by Spilsy; 02-09-2016, 05:13 PM.
              Spilsy
              Today is the tomorrow you were shitting yourself about yesterday - Billy Thorpe

              Comment


              • You should be able to remove the compressor from the blue sleeve, mount the backing plate to the second battery platform and slide the compressor back in.

                Comment


                • Originally posted by amts View Post
                  You should be able to remove the compressor from the blue sleeve, mount the backing plate to the second battery platform and slide the compressor back in.
                  Compressor is out of its sleeve. Had to take off the air filter to get it out.

                  Have removed the hard mounted hose. Will need to get some fittings to make the hose removable.
                  Spilsy
                  Avid PP Poster!
                  Last edited by Spilsy; 02-09-2016, 06:15 PM.
                  Spilsy
                  Today is the tomorrow you were shitting yourself about yesterday - Billy Thorpe

                  Comment


                  • Originally posted by Spilsy View Post
                    Compressor is out of its sleeve. Had to take off the air filter to get it out.

                    Have removed the hard mounted hose. Will need to get some fittings to make the hose removable.
                    The compressor is in. I bolted the toolbox bracket to the 2nd battery tray using 2 of the M8 tapped holes. Hopefully 2 is enough, it's a bit tricky to pick up any more.


                    I have used some nitto fittings on both the compressor and the air hose. Not sure what the ARB fittings are...?
                    Spilsy
                    Today is the tomorrow you were shitting yourself about yesterday - Billy Thorpe

                    Comment


                    • I mounted my compressor up near the fuel filter using my own aluminium bracket utilising all factory bolts.

                      I just removed the compressor from the box and drilled the rivet holes out larger and bolted to my bracket.

                      The ally bracket is bolted to the inner guard and also braced back to the firewall.

                      It has been mounted here for a couple of years with no problems so far.

                      Hope this helps.👍

                      Comment


                      • Thanks for the info. I just had to create a new hole on the bracket for bolt 2. I drilled out another of the holes for bolt 1.

                        What have you used to cover the air outlet?
                        How have the electrics (particularly the switch) handled life in the engine bay?
                        Also, what did you do to the end of the hose? I've kept the 90° elbow and added a nitto male fitting
                        Spilsy
                        Today is the tomorrow you were shitting yourself about yesterday - Billy Thorpe

                        Comment


                        • Originally I used a rubber chair leg floor protector ,but a mate gave me the silicone cover I have now I think you will find them on eBay possibly.

                          As the compressor is mounted quite high and near the rear of the engine bay no problems so far.
                          I utilised the existing wiring and fuse that came with the compressor.

                          I just pop the bonnet plug in the orange air line supplied with the kit and turn on the switch.

                          You just need to be careful removing after airing up as the fitting gets quite hot.

                          Comment


                          • Just ordered the ARB inflator off Amazon. Delivered cheaper than any Australian retailer.
                            Spilsy
                            Today is the tomorrow you were shitting yourself about yesterday - Billy Thorpe

                            Comment


                            • UVP from Bushskinz arrived today... They are heavy! Now to work out how to install...

                              Spilsy
                              Today is the tomorrow you were shitting yourself about yesterday - Billy Thorpe

                              Comment


                              • I just installed my Bushskinz yesterday. Rear plate first, with the largest spacers and longest bolts to the front.
                                2016 Crystal Pearl Auto VX 2.8, TJM Bar, Safari Snorkel, Cooper AT/3, OME 50mm lift, Dual batts

                                Comment

                                canli bahis siteleri bahis siteleri ecebet.net
                                mencisport.com
                                antalya escort
                                tsyd.org deneme bonusu veren siteler
                                deneme bonusu veren siteler
                                gaziantep escort
                                gaziantep escort
                                asyabahis maltcasino olabahis olabahis
                                erotik film izle Rus escort gaziantep rus escort
                                atasehir escort tuzla escort
                                sikis sex hatti
                                en iyi casino siteleri
                                deneme bonusu veren siteler
                                casibom
                                deneme bonusu veren siteler
                                deneme bonusu veren siteler
                                betticket istanbulbahis
                                Working...
                                X