 Tweet
Tweet
The pictures below show what I have done to my Prado for our 2 month trip through the north of WA and back to Perth via Alice, Uluru, Laverton.
I will attempt to put some more detailed pictures on later - but I thought I would start with these. If anyone is interested in more detail - let me know.
I was a bit rushed at the end getting some things done so some things here are not as good as I would like them. However it may give some others some ideas.
I have installed a set of ORS drawers (great � I love them). Because there was only 2 of us on the trip, I decided to temporarily remove the back seats. I intend to reinstall them now we are home again.
I extended the drawers forward � this created a shelf that was made up of three sections. The middle section was fixed (added to the strength of the bracket supporting the cargo barrier) and each side were removable to get to the gear underneath.
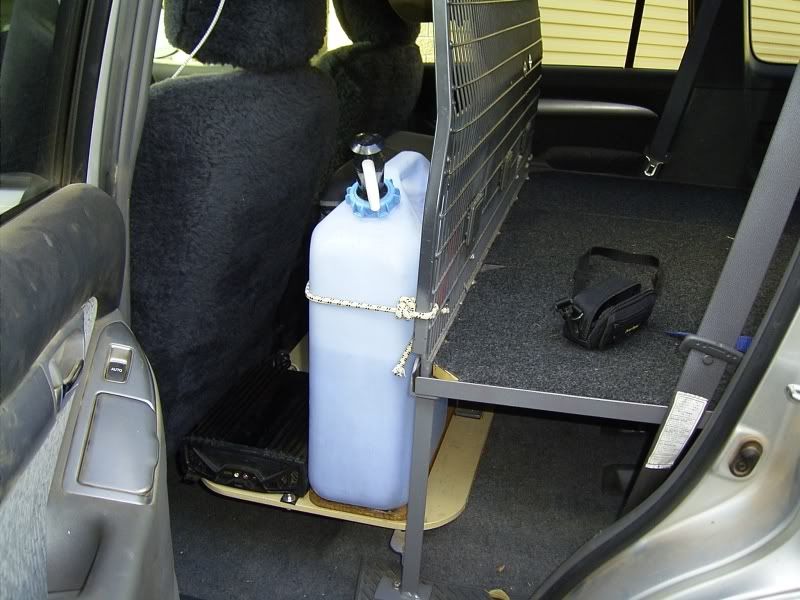
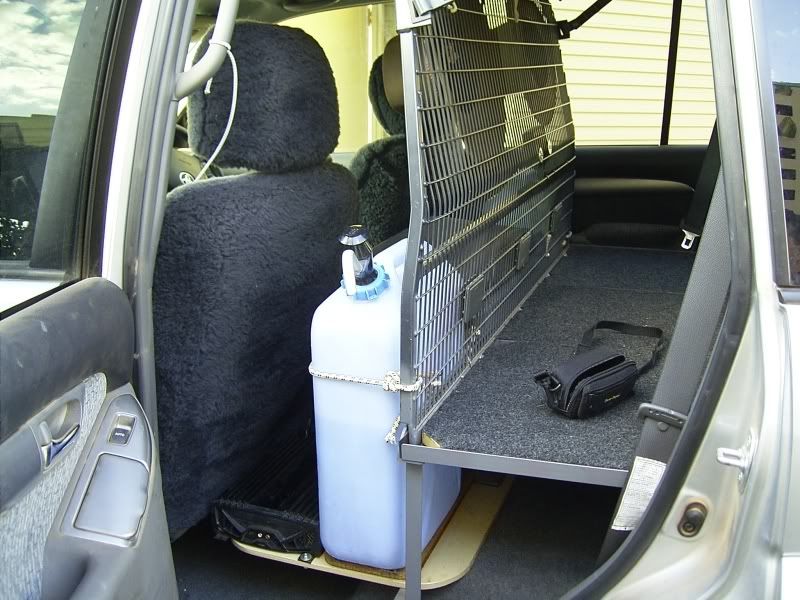
Speaking of the cargo barrier � this was a second hand Milford for a Prado � full height. I have cut this down to fit on top of the drawers. My original idea was for it to fit on top of the bracket/support behind the front seats when the rear seats are removed (as you can see here). Once I put the rear seats back in, the barrier would fit behind them. I have not tried this rear position yet so I�m not sure if it will work.
The cargo barrier top supports have been bolted to some brackets I made. Again � remember I was short on time and needed something that would work � this might not be a long term solution. I removed the rear handles and used some 4mm angle (25mm) steel that was a little longer than the handle. I drilled holes in the angle so that I could use the same bolt holes as the handle to secure the angle. I welded some 8mm thick steel bar along the angle, tapped a couple of holes (to allow for some adjustment) that I could screw the cargo barrier brackets to.
I used 8mm to give me a fair bit of tread to bolt into � so I didn�t have to use a nut. I figured that getting a nut behind a piece of steel would be painfully hard and not look as good. If you are interested more and this explanation is confusing � give me a yell and I�ll take some more photographs.
When I put the back seats in again � I�ll simply bolt back on the handles. As I say � a quick easy solution. I�m sure it could be improved on.

The position for the cargo barrier was set so we could get a 25 litre Waeco behind the front seat. This configuration means that the passenger could get to the fridge while we were travelling along.
Also check out the hat rack behind the seat (attached to the barrier)!
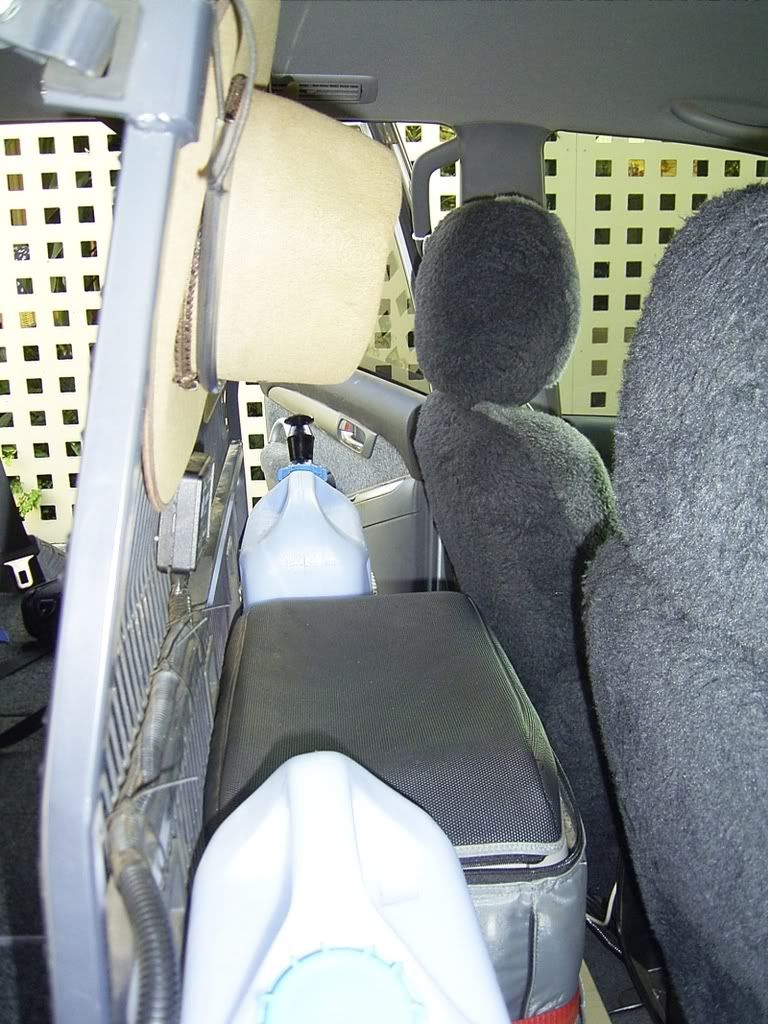
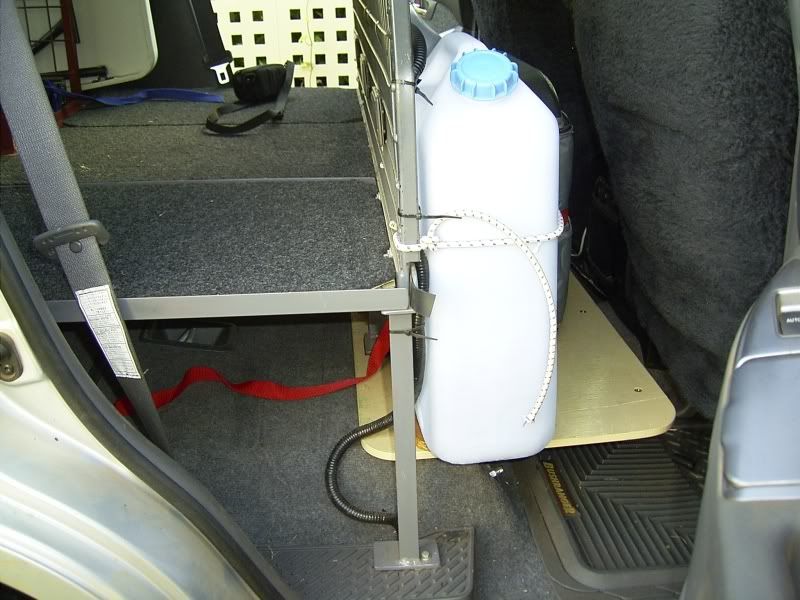
This shot shows a 20 litre water container position. I had two of these (1 each side) that were held against the cargo barrier support by shock cord. I wanted the water (40kg) as far forward as possible. You may see a manual water pump on one of the containers. I simply drilled a hole in one of the caps and put in a �caravan� style hand pump � the type that delivers water on the up and down stroke. This was great � simple. Not as flash as an electric pump - but as we mainly used our water on the camper trailer, it was fine. I would highly recommend this arrangement. To change containers � just change caps!
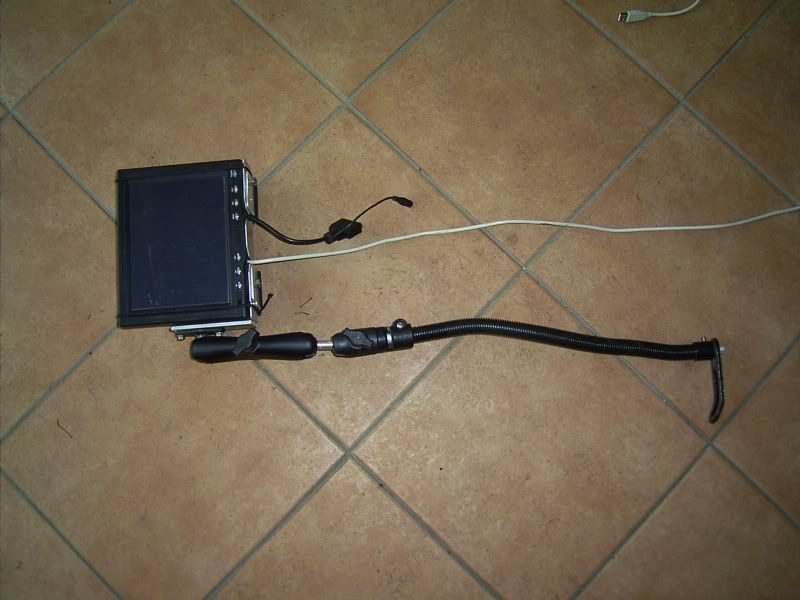
The small black box in front of the water container (behind the seat) is my PC.
The PC can be seen in the pictures above as the black box on a shelf in front of passenger side container (behind the seat). 12 volt supply (to the aux battery), Celeron� processor, 4xUSB ports, 80GB hard disk, DVD drive, 1GB memory. This unit is designed for cars and has an extremely solid cast aluminium case (we actually stored our first aid kit on top), I had a GPS mouse on the dash � you can just see it as a small dome in front of the screen in the pictures below. I never lost a good GPS fix with the receiver in this position � I see no reason to put it outside the car.
I ran navigation software and MP3 playing software (some 40GB of MP3 files) on this unit, Later next year I intend to put on engine diagnostics and wireless internet. I can certainly fit a lot of maps on this unit � I will even be able to fit some aerial photographs.
For music, I just ran the sound output into the AUX port of the existing radio. The steering wheel controls were great (probably essential) since I couldn�t easily reach the volume controls or change to radio.

I found this PC setup really great � but at the moment I don�t want to publicise where I got the PC. I am having some problems with the company over a faulty motherboard and memory. The unit was a really good price � but if I need to buy 2 motherboards � it will become expensive. Another couple of week may see this sorted out. If anyone wants some more information � PM me.
The 8 inch screen was great. Fine in the sun - but if the passenger was wearing a bright shirt and when the sun was in a particular direction -the reflections were quite bad. Overall, I have no hesitation recommending this unit (http://stores.ebay.com.au/SkyPro-Ind-Co-Ltd). I would highly recommend 8 inches � you may hear that size isn�t everything � nonsense � it is�.
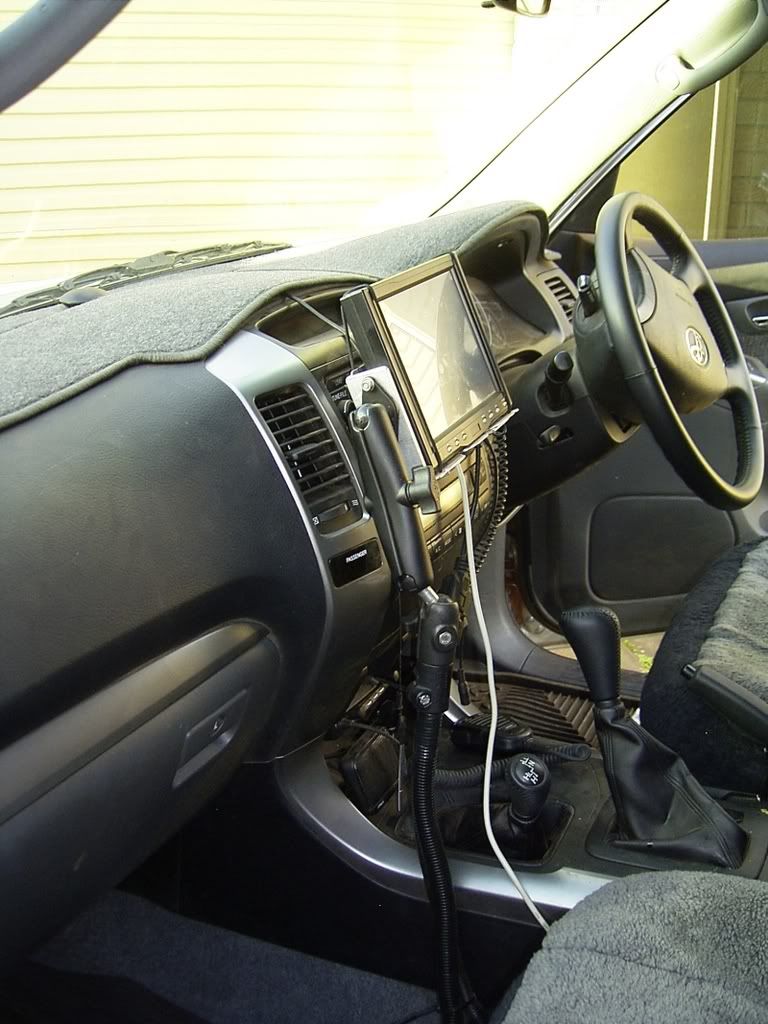
I debated where to put the screen and how to fix it for a long time � in the end I was very pleased with this position. I think that on top of the dash would obstruct vision a little and be a sitting target for thieves. I also think that down under the air conditioner is too low and you have to look too far away from the road to see what is going on. Yes - it made the radio hard to get at � but this was a very small price considering I have steering wheel controls.
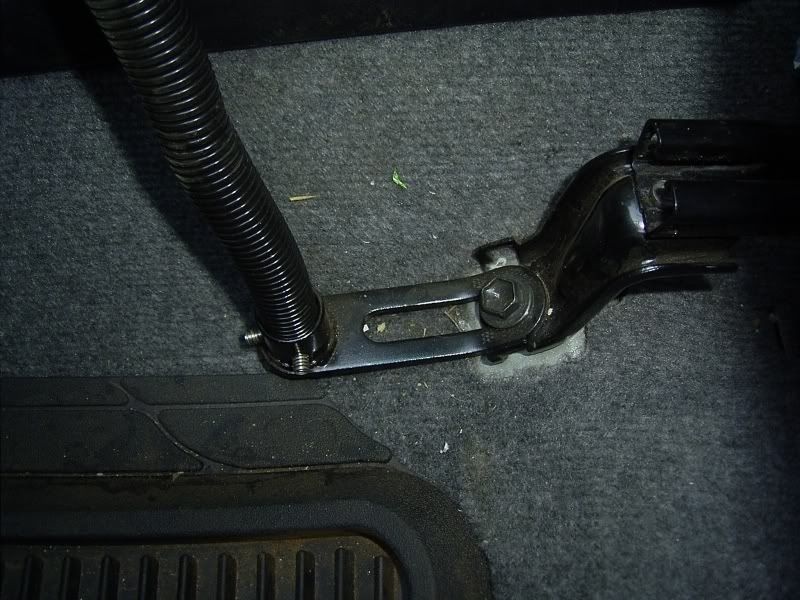
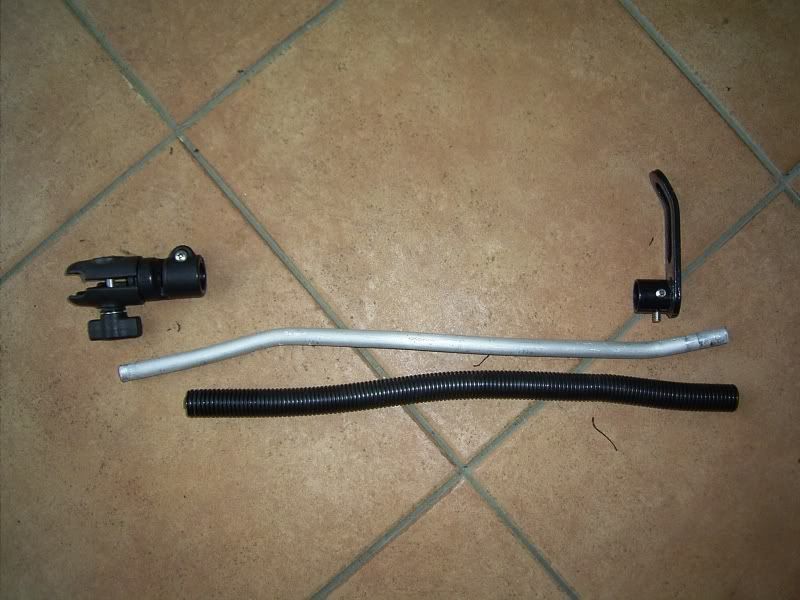
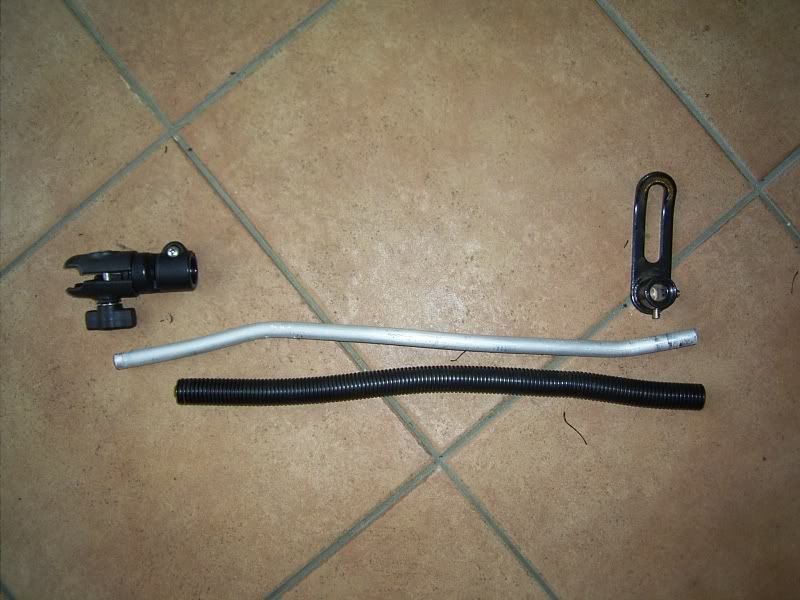
The screen is supported with a RAM-316-3sw1u Ram pod III (I think, I can�t find my receipt at the moment) . Even though the photographs make the �leg� look like a flexible �goose neck� that can be adjusted in any direction, it is in fact just a soft solid aluminium rod. Yes it�s easy to bend � but you don�t want to keep doing this. The leg bolts onto one of the front seat brackets. I have then added a long standard ball fitting to give me enough length. The advantage with this is that it is very stable and can easily take the weight of the screen, I think it is supposed to take over a kilogram of weight. However even with this specification, I made a bracket up to hold the screen that would also have some weight supported by the little shelf where the radio sits. I also put a small shock cord on that �holds� the screen in place and is attached to the air-conditioning grill under the wind screen. This made everything REALLY stable. The whole bracket that supported the screen was a bit �chucked� together to see if it would work. The idea was that I would make it neater and a bit lighter later. I never got the chance � possibly before the next trip. I�ll post some more pictures later showing some more detail.
I�ve got the UHF radio in the spot that other posts detail � under the air conditioner. These other posts were really great for showing me what to do. Look at Chippy�s rig. However I decided to put an extension speaker also in this location � probably overkill but I�m really bad at understanding radio conversations. More evidence I've got things to do - there is no bracket to hold the microphone!
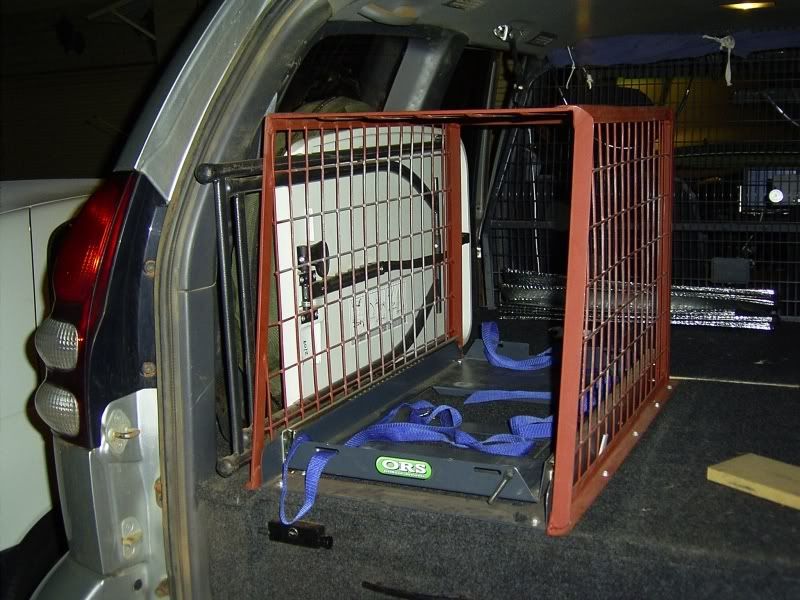
The cage in the back is for a 50 litre Waeco. This cage made it really easy to pack gear around it and still being able to get to the fridge. As evidenced of my rushed construction work - it's not even painted properly (just a little primer).
I'll post some more pictures later and give some interesting details about battery charging. I have a dual battery current meter that gives all sorts of details about EXACTLY how much energy is being used and is left. I have to get this info into a form that I can post - and I want to do some more controlled experiments at home.
Again please understand some of the things I have done here are unfinished - but knowing how I usually do things, It will be a year away until I finish things. I thought I should get some information out while I still have this setup looking like the photographs - I intend to put the rear seats again in a week or so.
I will attempt to put some more detailed pictures on later - but I thought I would start with these. If anyone is interested in more detail - let me know.
I was a bit rushed at the end getting some things done so some things here are not as good as I would like them. However it may give some others some ideas.
I have installed a set of ORS drawers (great � I love them). Because there was only 2 of us on the trip, I decided to temporarily remove the back seats. I intend to reinstall them now we are home again.
I extended the drawers forward � this created a shelf that was made up of three sections. The middle section was fixed (added to the strength of the bracket supporting the cargo barrier) and each side were removable to get to the gear underneath.
Speaking of the cargo barrier � this was a second hand Milford for a Prado � full height. I have cut this down to fit on top of the drawers. My original idea was for it to fit on top of the bracket/support behind the front seats when the rear seats are removed (as you can see here). Once I put the rear seats back in, the barrier would fit behind them. I have not tried this rear position yet so I�m not sure if it will work.
The cargo barrier top supports have been bolted to some brackets I made. Again � remember I was short on time and needed something that would work � this might not be a long term solution. I removed the rear handles and used some 4mm angle (25mm) steel that was a little longer than the handle. I drilled holes in the angle so that I could use the same bolt holes as the handle to secure the angle. I welded some 8mm thick steel bar along the angle, tapped a couple of holes (to allow for some adjustment) that I could screw the cargo barrier brackets to.
I used 8mm to give me a fair bit of tread to bolt into � so I didn�t have to use a nut. I figured that getting a nut behind a piece of steel would be painfully hard and not look as good. If you are interested more and this explanation is confusing � give me a yell and I�ll take some more photographs.
When I put the back seats in again � I�ll simply bolt back on the handles. As I say � a quick easy solution. I�m sure it could be improved on.
The position for the cargo barrier was set so we could get a 25 litre Waeco behind the front seat. This configuration means that the passenger could get to the fridge while we were travelling along.
Also check out the hat rack behind the seat (attached to the barrier)!
This shot shows a 20 litre water container position. I had two of these (1 each side) that were held against the cargo barrier support by shock cord. I wanted the water (40kg) as far forward as possible. You may see a manual water pump on one of the containers. I simply drilled a hole in one of the caps and put in a �caravan� style hand pump � the type that delivers water on the up and down stroke. This was great � simple. Not as flash as an electric pump - but as we mainly used our water on the camper trailer, it was fine. I would highly recommend this arrangement. To change containers � just change caps!
The small black box in front of the water container (behind the seat) is my PC.
The PC can be seen in the pictures above as the black box on a shelf in front of passenger side container (behind the seat). 12 volt supply (to the aux battery), Celeron� processor, 4xUSB ports, 80GB hard disk, DVD drive, 1GB memory. This unit is designed for cars and has an extremely solid cast aluminium case (we actually stored our first aid kit on top), I had a GPS mouse on the dash � you can just see it as a small dome in front of the screen in the pictures below. I never lost a good GPS fix with the receiver in this position � I see no reason to put it outside the car.
I ran navigation software and MP3 playing software (some 40GB of MP3 files) on this unit, Later next year I intend to put on engine diagnostics and wireless internet. I can certainly fit a lot of maps on this unit � I will even be able to fit some aerial photographs.
For music, I just ran the sound output into the AUX port of the existing radio. The steering wheel controls were great (probably essential) since I couldn�t easily reach the volume controls or change to radio.
I found this PC setup really great � but at the moment I don�t want to publicise where I got the PC. I am having some problems with the company over a faulty motherboard and memory. The unit was a really good price � but if I need to buy 2 motherboards � it will become expensive. Another couple of week may see this sorted out. If anyone wants some more information � PM me.
The 8 inch screen was great. Fine in the sun - but if the passenger was wearing a bright shirt and when the sun was in a particular direction -the reflections were quite bad. Overall, I have no hesitation recommending this unit (http://stores.ebay.com.au/SkyPro-Ind-Co-Ltd). I would highly recommend 8 inches � you may hear that size isn�t everything � nonsense � it is�.
I debated where to put the screen and how to fix it for a long time � in the end I was very pleased with this position. I think that on top of the dash would obstruct vision a little and be a sitting target for thieves. I also think that down under the air conditioner is too low and you have to look too far away from the road to see what is going on. Yes - it made the radio hard to get at � but this was a very small price considering I have steering wheel controls.
The screen is supported with a RAM-316-3sw1u Ram pod III (I think, I can�t find my receipt at the moment) . Even though the photographs make the �leg� look like a flexible �goose neck� that can be adjusted in any direction, it is in fact just a soft solid aluminium rod. Yes it�s easy to bend � but you don�t want to keep doing this. The leg bolts onto one of the front seat brackets. I have then added a long standard ball fitting to give me enough length. The advantage with this is that it is very stable and can easily take the weight of the screen, I think it is supposed to take over a kilogram of weight. However even with this specification, I made a bracket up to hold the screen that would also have some weight supported by the little shelf where the radio sits. I also put a small shock cord on that �holds� the screen in place and is attached to the air-conditioning grill under the wind screen. This made everything REALLY stable. The whole bracket that supported the screen was a bit �chucked� together to see if it would work. The idea was that I would make it neater and a bit lighter later. I never got the chance � possibly before the next trip. I�ll post some more pictures later showing some more detail.
I�ve got the UHF radio in the spot that other posts detail � under the air conditioner. These other posts were really great for showing me what to do. Look at Chippy�s rig. However I decided to put an extension speaker also in this location � probably overkill but I�m really bad at understanding radio conversations. More evidence I've got things to do - there is no bracket to hold the microphone!
The cage in the back is for a 50 litre Waeco. This cage made it really easy to pack gear around it and still being able to get to the fridge. As evidenced of my rushed construction work - it's not even painted properly (just a little primer).
I'll post some more pictures later and give some interesting details about battery charging. I have a dual battery current meter that gives all sorts of details about EXACTLY how much energy is being used and is left. I have to get this info into a form that I can post - and I want to do some more controlled experiments at home.
Again please understand some of the things I have done here are unfinished - but knowing how I usually do things, It will be a year away until I finish things. I thought I should get some information out while I still have this setup looking like the photographs - I intend to put the rear seats again in a week or so.

Comment