Sammo, the recovery points turned out well and are fitted to the Prado ready for the weekend beach run. Bit concerned about how close they are to the tie down points but there seems to be enough room (just) to get the shackle in there. The radiator is a problem but nothing that couldnt be got around. Thanks for the advice on them but hopefully I never need them, fingers crossed.
cheers pete, they r close to the factory points but i made em that way so they dont stick out to far and caught on stuff, 3.25 tonne bow shackle and 4.75 go through, and if ya worried abut strength pm quicky on the forum, he got stuck in a hole in clay on his fuel tank and i hit him 15 times to get him out, no worries. cheers samo
had an 03 gx 120 with some gear now got a 2013 bt 50 GT auto some ARB gear.
I fitted mine with a few hardened 12mm washers on the inside of the point. 2 on top hole one on bottome due to bullbar mount. This gives me clearance to get the 4.75t shackle beween OEM point and custom point. Shackle is able to pivot up and down for movement with equalizer strap. Will take another photo when I get back if you want chaps. :mrgreen:
thanks sammo, hopefully I wont need 15 hits but good to know they can take it to. I do like the idea (golly's) of the hardened washers to space them out a bit if needed. Will find out on Sunday I guess. Will rip them off and paint them all fancy like after the weekend.
Brilliant forum and a huge help for us not so knowleg...knowlgd...clever people.
Update and final call
Well now I have a completion date to work to � a fellow Prado owner at my office who has been helping with drafting is going on holidays in 2 weeks. I need to have the recovery points done by then.
I have done a few modifications from LenGXV6�s fantastic design. I have decided that I�m only going to build the 3 hole �long� version recovery point (as per the design below). I have simplified the shape and moved the shackle hole out and downwards a bit. I had thought the original place for the hole was just a little tight for the shackle around the Prado�s tie down points.
The third bolt hole up on the chassis I thought was a bit tight � a slight difference in the drilling of the hole or a different spot for the existing hole on the chassis could see the bolt not fitting. So I have moved it a little. Now this is one of the things of slight concern. The original design called for the bolt at the top going through an existing quite large hole in one side of the chassis � and needing the other side of the chassis to be drilled. Now if the outside hole (the existing one) was quite loose, would this bolt really be taking much of the strain in a snatching situation? I think that because the hole on the other side of the chassis was snug and the whole recovery point being compressed onto the chassis then, while it wouldn�t be a good as 2 snug fitting bolts boles on both sides of the chassis, it would still be a huge improvement to the traditional recovery points that are only held on by 2 points.
Some alternatives could be:
1. Weld a say 4mm plate over the large existing hole onto the chassis and drill though this (but would this welding potentially weaken the chassis?)
2. Have another hole drilled in the recovery point say 30mm away from the originally planned hole and then drill the chassis on both sides and fit the recovery point (again would this weaken the chassis?)
I�m not sure what I do � but I plan to get the laser/plasma cutter to drill another hole at the top to provide me some flexibility.
By the way � I figure the best way to drill either hole would be to remove the wheel. That would make it really easy.
A couple of other things with the design� The width of the steel at the bottom is really overkill for a normal recovery point. However I did this for a couple of reasons:
� One of the people that is getting a set is going to weld a bracket to the bottom so he can bolt a tow ball on the front so he can push a very lightweight boat trailer around (he hasn�t got a bull bar). The width of steel at the base should make this quite strong.
� I don�t think a bit more steel hurts - probably another half a kilo in weight � and there�s flexibility to do other things in the future.
So�.I plan to order these early this week. Because the design is a little different than before I�m not sure of the exact cost. I�m betting a maximum of $45 per set (perhaps $35). I�ll also get a quote on the backing plate (for behind the chassis on the top hole) � originally I thought I would cut/drill this myself but for probably $5 extra � why stuff around?
Based on the weight of steel they will cost about $20-$25 to post to the Eastern States (Sydney/Brisbane). If the actual weight will mean that adding bolts will take it to the next price bracket, then perhaps you can source them yourselves. Those in Perth can either pick up from me or wait �till the next PradoPoint Tech Day.
I�m actually travelling all over the Eastern States between August and December this year � perhaps I can deliver in person � but the cost in this situation will be to show me some lesser known, spectacular place that my wife and I can go in the Prado.
Also note in the design below, all the corners are rounded and the shackle hole is also rounded. The finished product will not be painted � I�ll leave that up to others.
So � Final cost
Main recovery points - $45 (or less)
Bolts (2 x high tensile, one metric mild steel + 2 nyloc nuts) � I guessing but $10?
Backing plate - $5
Postage - $25
Now this may be a bit expensive for those on the wrong side of Australia. I certainly don�t mind providing the plans in DWG and DXF format so you can organize your own or a couple of you in the same city get together and organize.
Update and final call
Well now I have a completion date to work to � a fellow Prado owner at my office who has been helping with drafting is going on holidays in 2 weeks. I need to have the recovery points done by then.
So�.I plan to order these early this week. Because the design is a little different than before I�m not sure of the exact cost. I�m betting a maximum of $45 per set (perhaps $35). I�ll also get a quote on the backing plate (for behind the chassis on the top hole) � originally I thought I would cut/drill this myself but for probably $5 extra � why stuff around?
Based on the weight of steel they will cost about $20-$25 to post to the Eastern States (Sydney/Brisbane). If the actual weight will mean that adding bolts will take it to the next price bracket, then perhaps you can source them yourselves. Those in Perth can either pick up from me or wait �till the next PradoPoint Tech Day.
I�m actually travelling all over the Eastern States between August and December this year � perhaps I can deliver in person � but the cost in this situation will be to show me some lesser known, spectacular place that my wife and I can go in the Prado.
Also note in the design below, all the corners are rounded and the shackle hole is also rounded. The finished product will not be painted � I�ll leave that up to others.
So � Final cost
Main recovery points - $45 (or less)
Bolts (2 x high tensile, one metric mild steel + 2 nyloc nuts) � I guessing but $10?
Backing plate - $5
Postage - $25
Now this may be a bit expensive for those on the wrong side of Australia. I certainly don�t mind providing the plans in DWG and DXF format so you can organize your own or a couple of you in the same city get together and organize.
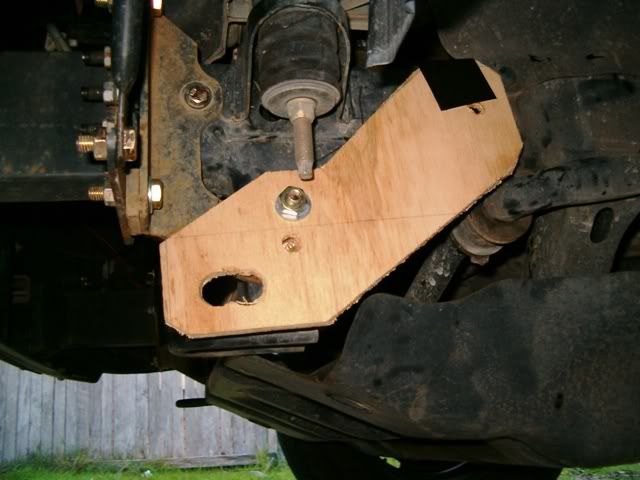
I have just noticed that while I can see both images in Firefox - only a actual photograph (like in 'spot the spot') shows in Explorer. I have no idea why. (bloody Microsoft). I'll take a photo of the mockup once it gets a little lighter.
For those looking at this with Firefox - I have noticed that the picture doesn't completely show unless your zoomed out a bit. I do this by pushing the Ctrl button and at the same time turn the wheel on the mouse. You can also select from the menu at the top 'View' and 'Zoom'.
I can send the original file to anyone that PM's me - giving their email address.
Violet, I have noticed a glitch with photobucket or this forum of late.
When you left click the IMG line on your image at photobucket, right click copy
When you get onto this screen, ctrl v the image in. Try this.
Dont ask me why, but my sigs would never work until I tried this, might be a PHPBB thing, as my own forums had the same problem.
Would like to see an image of this here as I may just take my set off to replace with yours... :mrgreen:
The third bolt hole up on the chassis I thought was a bit tight � a slight difference in the drilling of the hole or a different spot for the existing hole on the chassis could see the bolt not fitting. So I have moved it a little. Now this is one of the things of slight concern. The original design called for the bolt at the top going through an existing quite large hole in one side of the chassis � and needing the other side of the chassis to be drilled. Now if the outside hole (the existing one) was quite loose, would this bolt really be taking much of the strain in a snatching situation? I think that because the hole on the other side of the chassis was snug and the whole recovery point being compressed onto the chassis then, while it wouldn�t be a good as 2 snug fitting bolts boles on both sides of the chassis, it would still be a huge improvement to the traditional recovery points that are only held on by 2 points.
Some alternatives could be:
1. Weld a say 4mm plate over the large existing hole onto the chassis and drill though this (but would this welding potentially weaken the chassis?)
2. Have another hole drilled in the recovery point say 30mm away from the originally planned hole and then drill the chassis on both sides and fit the recovery point (again would this weaken the chassis?)
I�m not sure what I do � but I plan to get the laser/plasma cutter to drill another hole at the top to provide me some flexibility.
Violet
I made a set myself some time ago similar to three bolt design you have drafted, for the top bolt I made a plate with a captive nut and a short length of welding rod welded to it and then slid up inside the chassis rail and bolted, similar to the way Hayman Reece tow bar bolts are fitted sometimes. That ensures the chassis rail won't experience any crush from the bolts.
Adrian
Silver '04 KZJ120~Manual~GXL~Dobinson/Kings lift~Custom valved Ironmans~Detroit Locker~Endless Air~X9 Superwinch~Madman EMS1~TJM Dual Battery~Rhino Roof Tray~120W solar panel~Foxwing awning~Bushskinz UVP~Long Ranger water tank~Bushman fridge~Steinbauer P-Box~Beaudesert 2 3/4"~Airtec Snorkel~TJM Sliders~Prico Boost Gauge~BFG-KO2s~TPMS~GME TX3420~Front and Rear Cameras~Ultimate Camper hanging off the back!
For all those following this thread regarding my making some recovery points and making them available for others - see a new thread (www.pradopoint.com/viewtopic.php?f=4&t=6050).
I thought I would start a new thread just about the bulk purchase (I had the OK to do this from a moderator)
Guys, In LenGXV6s pic, Im not sure what the fit up is like around the Sovereign bullbar support bracket. :? I was just looking at mine, and it doesnt look like a flush mount. Are spacer plates or washers being used :?: :?: .
I have looked thru this thread, and apols if I have missed something obvious :?:
I was using washers behind the plate to make it flush, however a friend has cut some plate to the correct size and I am now using that.
LC 120 03 GX V6, Bonnet/Head light Protectors, Home Made Draws.Toyota Tow Bar.Cooper ATR 235/70/R17 RE+. Toyota Bullbar with fog light. Navra 150 Spot Lights.
[url="http://tikarn669.googlepages.com/home"]http://tikarn669.googlepages.com/home[/url]
 Tweet
Tweet

Comment