 Tweet
Tweet
Has anyone located the manual transmission and transfer breather in a 6 speed man 150 ?
-
[CENTER][B][U]Matt
[/U][/B]2012 Silver GXL TD 6 Speed manual with some stuff..
[/CENTER]
[CENTER][SIZE=2]My 2008 Lifestyle 360i camper - [URL]http://myswag.org/forum/index.php?topic=21797.0[/URL]
My 4WD Action write up 2004 120 V6 Prado - [URL]http://www.4wdaction.com.au/articles/2012/complete-package[/URL][/SIZE][/CENTER]
[SIZE=2]
[/SIZE][CENTER][SIZE=2]
[/SIZE][/CENTER] -
Hi Matt,
On top of the bell housing behind the enigine. There is a photo at the start of this thread in post 3 for an auto, manual is in the same spot. Bit of a hassle to get at but not too bad and worth extending. This was the longest part when I extended all of mine.[B]Dave[/B] - 2010 Silver GXL Prado 150 TD Manual.Comment
-
Dave,
I hav failed in stripping the console to get to them from the top. Now, before I have to perform a miracle to reach these breathers on th manal bell housing, have you spotted these on your truck ?
There will be swearing and bloody knuckles, so I need to know they are actually there ! [CENTER][B][U]Matt
[/U][/B]2012 Silver GXL TD 6 Speed manual with some stuff..
[/CENTER]
[CENTER][SIZE=2]My 2008 Lifestyle 360i camper - [URL]http://myswag.org/forum/index.php?topic=21797.0[/URL]
My 4WD Action write up 2004 120 V6 Prado - [URL]http://www.4wdaction.com.au/articles/2012/complete-package[/URL][/SIZE][/CENTER]
[SIZE=2]
[/SIZE][CENTER][SIZE=2]
[/SIZE][/CENTER]Comment
-
Well, that was a total motherless goat of a job.
I took Dave at his word and dived into the job. I found the breathers mounted on the top of the manual clutch bellhousing and managed to pull the breathers down for access.
Here they are..

Then I took another look from the drivers side and found another bloody breather !. I am thinking there is a transfer case breather, a gearbox breather and the final one might before the bellhousing ? God only knows.. Anyhow I managed to join the first two lines with a tee peice, then I adapted the final (re: in a bastard of a spot !) and routed them all up to another tee peice, and up to my third Caterpillar breather. These big breathers are brilliant, one on its own could manage the entire driveline if required.
Few finished pics, time for a beer cause I am hurting in places I forgot I had !

 [CENTER][B][U]Matt
[/U][/B]2012 Silver GXL TD 6 Speed manual with some stuff..
[/CENTER]
[CENTER][SIZE=2]My 2008 Lifestyle 360i camper - [URL]http://myswag.org/forum/index.php?topic=21797.0[/URL]
My 4WD Action write up 2004 120 V6 Prado - [URL]http://www.4wdaction.com.au/articles/2012/complete-package[/URL][/SIZE][/CENTER]
[SIZE=2]
[/SIZE][CENTER][SIZE=2]
[/SIZE][/CENTER]Comment
-
Thanks heaps hookedon4wding and crisp imag for this info and the detail you supplied in your posts, did the mod today with your instructions and pic's, all went well. Cost me $75 and about 5 hours but that includes moving the fuel breather from underneath up into the Fuel filler cap area. 5 breathers Plus the fuel breather!! D4D auto GXL 2011 Model.
Comment
-
Hi sapradogxl
Do you have any further images of your particular breather install (such as the bracket and hoses)? Is it a breather kit?[CENTER][/CENTER][B]RYAN[/B]
[CENTER][/CENTER]2012 White GXL TD Auto with some stuff...Comment
-
Location of front diff/transfer case breathers
All sorted. CheersLast edited by vscorsa; 21-03-2013, 06:23 PM.Comment
-
Excellent instructions. I went to my local and three other Repco stores today to buy the parts required. I could get the hose but none of them sell the connectors. Any suggestions on where I could get them? I also went to Super Cheap and Aussie Auto. Still no good.Originally posted by hookedon4wding View PostComment
-
Don't forget this thread as well (have to say I didn't see this one when I went looking because I went to the Drive Train section). Is it worth merging them???
http://www.pradopoint.com/showthread...Diff-breathers
Sand Runner I bought all my bits from Fittings Express
http://www.fittingsexpress.com.au/page/28404196
Nothing to do with me, just a good little local company that I have used before. They do mail order as well with quite efficient service. I bought hose and fittings from there. I also picked up a cap for the compressor while I was there. Enzed should have the bits too. If you look at the link I posted in the thread I wrote above you will see what Ben has mentioned about the bits you need. For the 1/8" - 1/4" hosetail adapter I bought a 1/8" hose tail to 1/8" male BSP and 1/4" hose tail to 18" BSP female and screwed them together. You will need two for the transfer case breathers.
So confirming there are 5 breathers excluding the fuel tank breather/valve. Rear diff, front diff, gearbox (all 1/4" hose) and two out of the transfer case (1/8" hose). If you use brass hosetails you will need to use clamps.
If you go to ToyoDIT and get to the 150 spec you will see the breathers in the arrangement drawings.My 150 build - http://www.pradopoint.com/showthread.php?27423-A-Random-approach-to-a-Bluestorm-150-GXL-D4D-automaticComment
-
OK so let me get this straight.
I need 1/8 fuel hose for the three breathers on the bell-housing and 4mm joiners.
I need 5/16 fuel hose for the front diff with a 5/16 joiner.
Yes??Comment
-
SandRunner only two of the transfer case hoses are 1/8", all the others are 1/4". Actually a bit bigger than 1/8" and a bit bigger than 1/4". Don't know if 5/16" is the size but 1/4" is definitely too big for the transfer case breathers. I have seen a 1/4" hosetail split the smaller hose. Maybe 3/16" if you can find it. I used 1/4" fuel hose up to the new breathers so for the front diff and auto gearbox I used a 1/4" - 1/4" hosetail joiner but you will need a hose clamp to hold the two Toyota hoses on firmly. At the rear diff I used the Camry fuel union which is 1/8" BSP (maybe NPT I didn't check and they are close enough the same) to 1/4" hosetail. Again I used a hose clamp. You will need small clamps to go over the two smaller transfer case breather hoses. I didn't use the usual spiral screw type but grabbed some clamps to suit 1/4" OD hose.
Does that make sense? Some people have just extended the 1/8" hose and not made up an adapter. That thread from the 120s goes into detail of others installs. I just use 1/4" fuel hose up to the new breathers so I don't have to get anything special for one or two breathers.My 150 build - http://www.pradopoint.com/showthread.php?27423-A-Random-approach-to-a-Bluestorm-150-GXL-D4D-automaticComment
-
Ok this clears things up a little thanks. So the third breather on the bell housing (auto??) is a 1/4"?Comment
-
Yes. Two are 1/8" and one is 1/4".
These are 1/8"
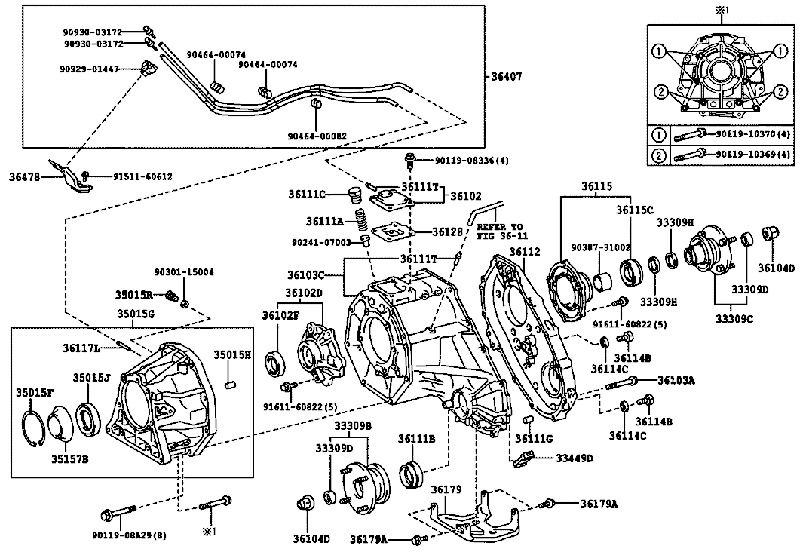
This one is 1/4"
They all sit in the same bracket.
Images are off ToyoDIY so mods if that breaches any copyright please delete.
MichaelMy 150 build - http://www.pradopoint.com/showthread.php?27423-A-Random-approach-to-a-Bluestorm-150-GXL-D4D-automaticComment
-
Thanks mjrandom. I extended my rear and front diffs this morning before work. Very easy quick job those two are. I went to Pirtek and bought the hose and brass fittings to do this and the three on the bell housing. When I get a bit more time I will attack those on the bell housing. I think they will take a little longer.......Comment
-
Well, finally got the last of the breathers done yesterday morning. Not that hard at all when following these instructions. Thanks guys. But there is no hope in hell I will be able to replace the hoses to the factory plastic clips on top of the transfer box or bell housing. Zip ties will have to do.
Did anyone get the hoses back into the factory clips after doing the extensions??Comment

Comment