-
Has anyone fitted front recovery points to a 150 with just the standard Bumper bar ?and if so have any photos?,early,not face lifted model . -
Just completed this exercise today - I'd say 30 mins per side, but only cause of the excellent advice from the above contributors. My ARB captive nuts were orientated the same as Holywood's - i.e. the long end towards the front of the car and I would say this made extraction easier - I did't have the same issues as Hollywood getting them out, just some bending and wiggling and they came free. In case anyone is wondering, the forward nuts in chassis for the recovery point is welded (or at least very securely "captured") and there's no risk of loosing them - I was worried about this, but all was ok. If anyone in Perth wants assistance with this process, having done it once, I reckon we could knock the job over easily over a beer - let me know!
Sincere thanks again for those that have gone before me and done such a top job photographing and recording the process. Cheers!Leave a comment:
-
 Guest repliedI have seen another ARB bar with the wrong pitch bolt inserted into the same hole, thus making a bit of a mess in there also.
Leave a comment:
-
The retapped threads are bugging me now as the 'new' threads weren't all that flash. I think I'll end up putting a helicoil in there for peace of mind!Leave a comment:
-
Looks like you managed to get some knuckle dragger working on your car Hollywood, I would fit them the same way you would. I can completely agree with fitting stuff yourself, since delivery the only person other than me to work on mine has been a tyre fitter, only cause I can't be bothered to fit tyres. That workmanship from ARB really is especially poor though, retapping threads, cracking your grille, amateur hour!Leave a comment:
-
Something else I noticed with regard to the ARB captive nuts on my vehicle.
If I was fitting them I would put them this way around so that the piece of flat acted as a washer under the nut inside the chassis rail...
Mine were fitted by ARB like this...
Does anyone know if there's a reason why they would put them this way around?Leave a comment:
-
I may have lead you astray with my bottom bolt. As AMTS said, it should have been an M12 thread in the chassis and therefore the bolts supplied with the Roadsafe kit would fit straight in. For some reason my lower bolts were M14s and were too short to use with the Roadsafe bracket. By the looks of it ARB have increased the size by drilling and tapping and bigger thread into the chassis (And they did a terrible job of that too by the way!). Anyway the bolts tightened up OK so I don't think it's going anywhere. But yes, ARB should have told me they'd done that, but then again they should have also told me they cracked my grill when installing the bullbar, that they left two bolts out and that they broke two locating tabs off the bottom of my grill too! This is why I try to do my own work wherever I can. The 'she'll be right mate' attitude of many tradesmen and fitters these days just astounds me.Leave a comment:
-
Now that is what a simpleton like me has been waiting for - many thanks to the collective group who've gone to the effort to document their installs. Cheers!Leave a comment:
-
Guest repliedUsually, the ARB's captive nut is fished out from the same rectangular hole that the nut plate is fed in.
Also the front lower bolt is a fine pitch M12, not M14. If they were M14, I'd be questioning the bullbar installer as to why thy ended up being M14.Leave a comment:
-
Yes as mjr stated, great photos with clear information for all to see. Good job Hollywood..
Sent from my iPhone using TapatalkLeave a comment:
-
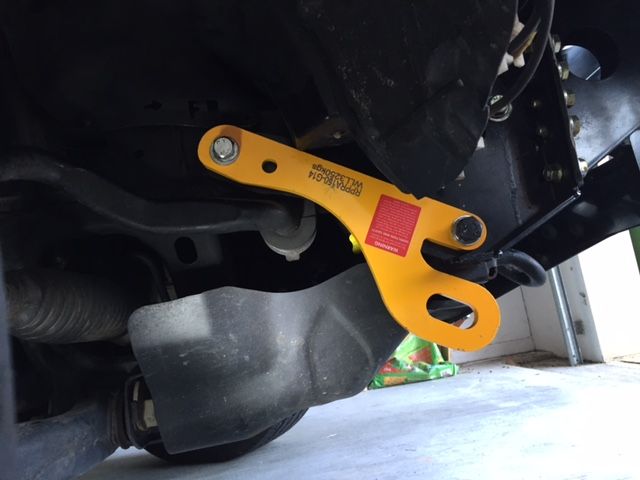
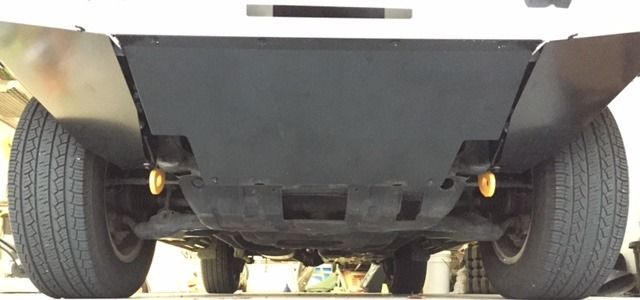
I also fitted a set of these recovery points to my 2010 GXL today and I also have an ARB Deluxe bar fitted so the previous posts were a big help.
The passenger side took about 10mins, the drivers side took two hours! Thought I'd post some pics to add to the previous posts in order to illustrate some issues I had.
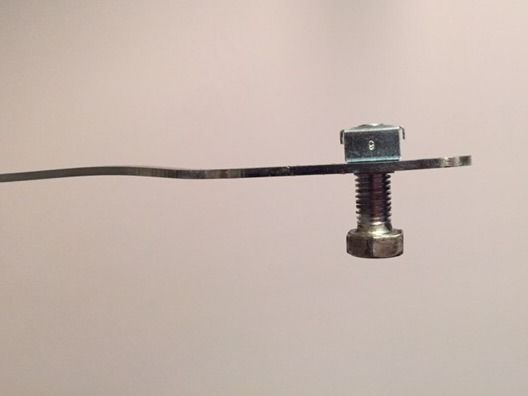
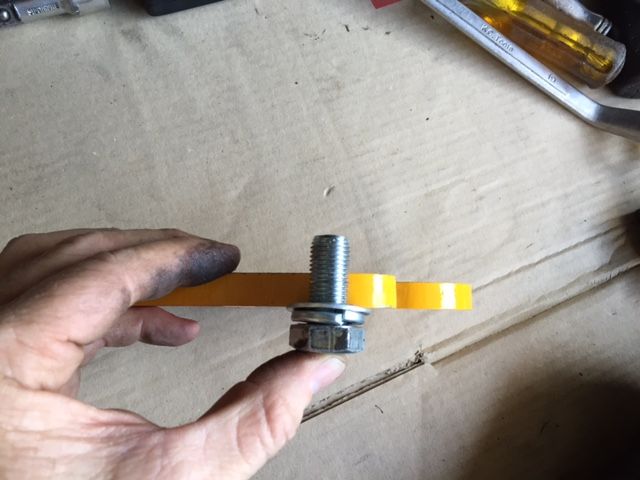
Firstly, I was unaware of just what these ARB captive nuts looked like and assumed they looked like the replacement 'nut on a wire' that came with the Roadside recovery points. Here's what the ARB ones look like...
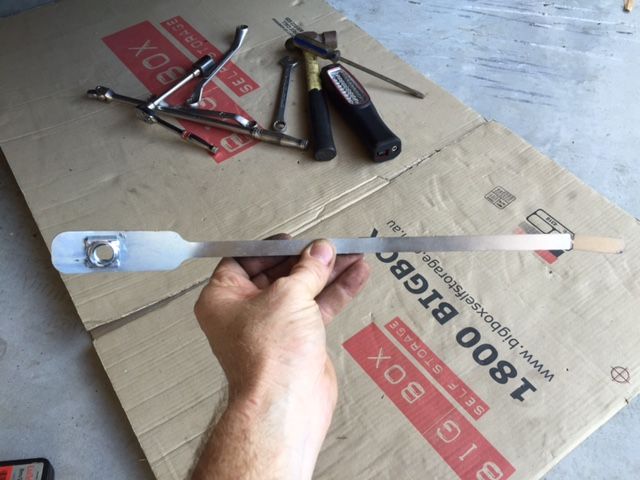
And this is about where they sit inside the chassis rail.
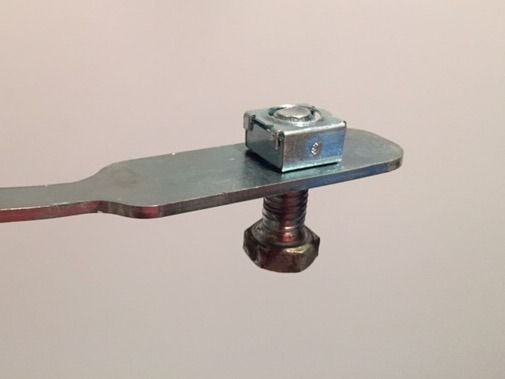
Because I thought they were the same as the shorter Roadsafe ones I mistakenly assumed they came out through the small rectangular hole in the side of the chassis where you insert the Roadsafe ones. (Stole your photo Borgy!)

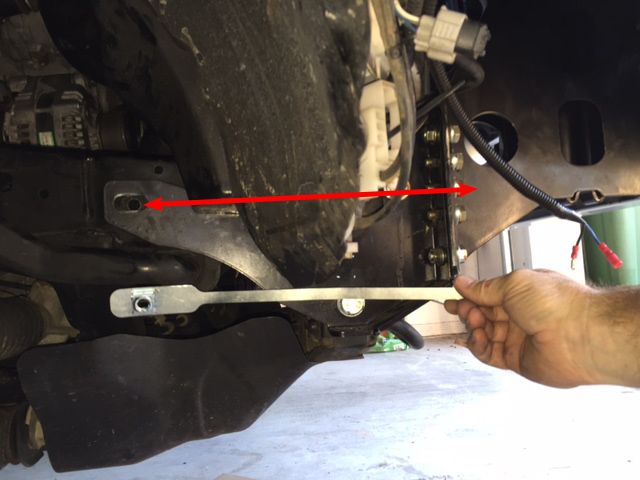
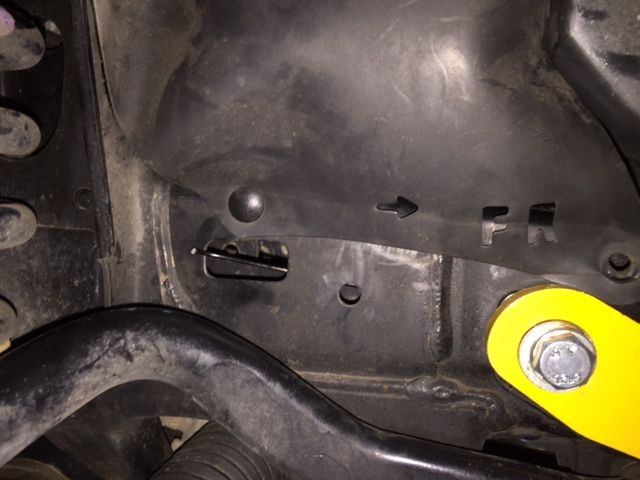
They don't, you pull the ARB ones out through the front, through the forward most rectangular hole. I was able to put my fingers through the circular hole and hold it while I undid the rear bolt.
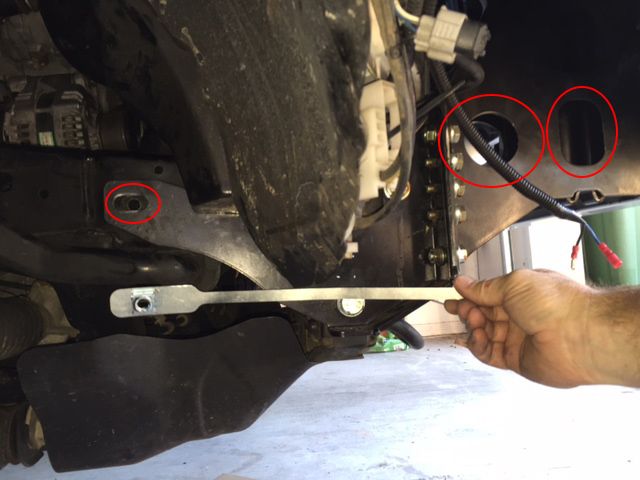
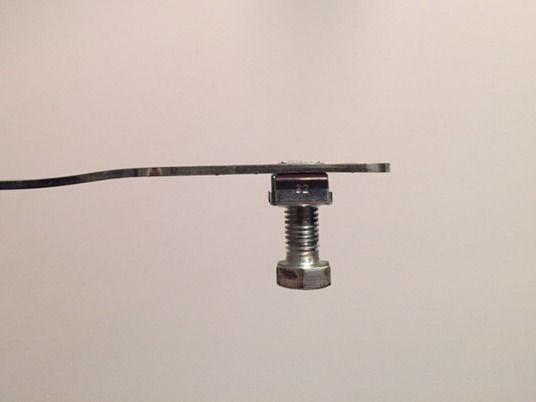
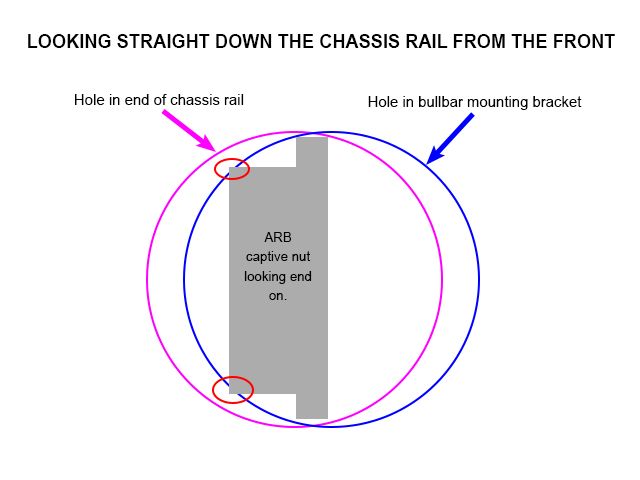
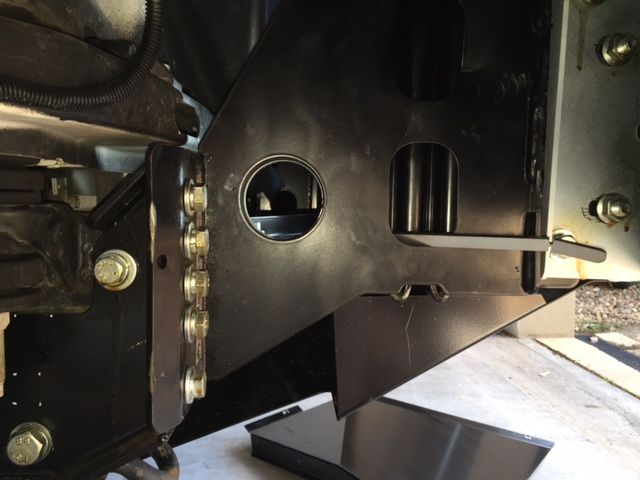
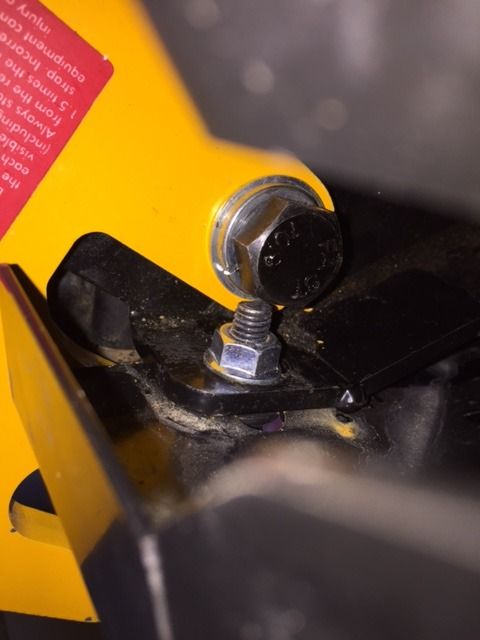
Here is where my problem started! The hole in the ARB bulbar mount and what I think was a hole in the chassis rail that you're supposed to pull the nut through didn't line up perfectly. This meant that when I got to the end of the ARB nut, where it widens out and the actual nut is located, I couldn't get it through the hole! The nut kept hitting the edge and it didn't matter which way I turned it. This pics tries to illustrate the issue...
What I ended up having to do was loosen the bullbar mount and pry it across to the left just enough to line the holes up a little better. Then with the help of a sturdy screwdriver I was able to lever the nut past the misaligned opening and out into the world! (You'll have to bend the long silver tab a bit to get it out.)
Fitting the Roadsafe 'nut on a wire' through the rear smaller rectangular hole was straight forward as was locating it with the bolt. I cut the excess wire off just outside the hole so I can easily access it.
When I went to fit the lower bolt I realised it wasn't going to be long enough. The pic below doesn't look too bad but it still has to go through the bullbar mounting plate so you lose about 3-4mm there and you'd end up with about 4-5 threads in the nut in the chassis. ARB had made a bit of a dog's breakfast of the first few threads in the chassis when they fitted the bullbar as well (Really not impressed with their workmanship!) so I opted to get some longer bolts. The originals were M14 x 1.5 x 30, I replaced them with M14 x 1.5 x 50 (20mm longer).
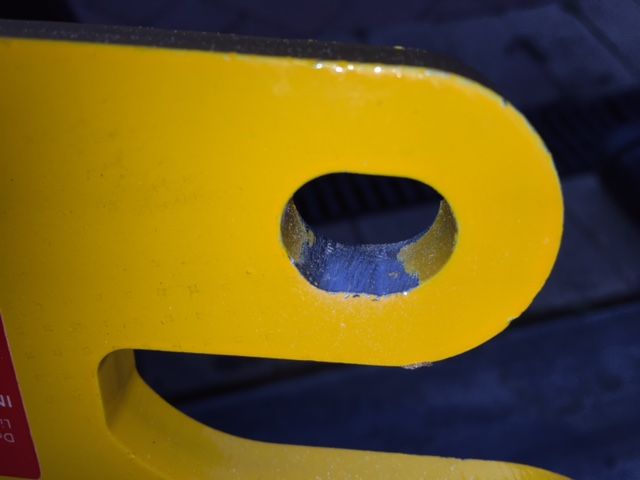
I then noticed that the bolts wouldn't fit through the hole in the Roadsafe bracket, they were extremely close so I took off the powder coating and a 'poofteenth' of material with a round file and they slid straight through. Crisis averted!
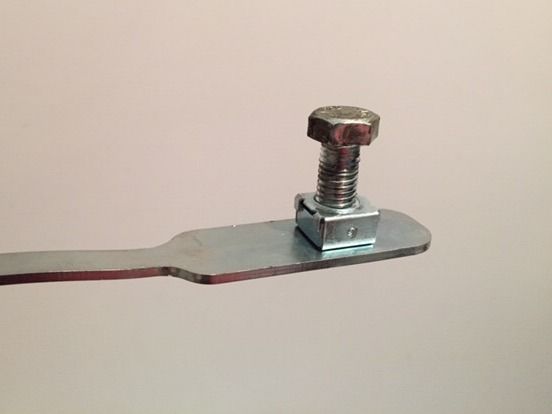
Finally I refitted the 'wings' and as Borgy mentioned the lower mounting bolt for the Roadsafe bracket hits the 13mm bolt so an extra flat washer under the head of the bolt easily solved that issue.
ALL DONE! Without the ARB nut issues it would have been a relatively quick job.
Leave a comment:
-
Hi, i should have a set of RS recovery points for my car this week. What was the Torque people are using for their bolts?
ThanksLeave a comment:
-
We put the RoadSafe (#RP-PRA150) on to a stock Prado GX 2014. Did put the car on chasis stands but left the wheels on. No dramas, enough room. Each side took about 20 minutes to fiddle and fasten the two bolts.Leave a comment:
-
I fitted mine this afternoon, took about 1/2 hour a side. on a 150 GXL with ARB deluxe bullbar.
The trick I found (with help) with the nut on a wire (or strip of flat in the case of the ARB one) was to get the bolt to its last few threads, using the wire from the new nuts put pressure on the ARB captured nut from the square hole behind the nut. Just as the bolt releases it pushes the ARB one forward and then allowing you to grab it and remove via one of the holes available.
If ARB don't snap off the tab on their captured nut it would be a lot easier to remove. They could easily leave it on there is no reason to snap it off.
I left the wheels on, just turned them out of the way. I found there was heaps of room. I don't have the KDSS though.


 Last edited by Justinvv; 09-03-2015, 09:42 PM.
Leave a comment:
- Please update your email address to ensure you receive our emails.
- Welcome to the updated Pradopoint. The private message system has been enabled.


Leave a comment: